Nature of Action Table
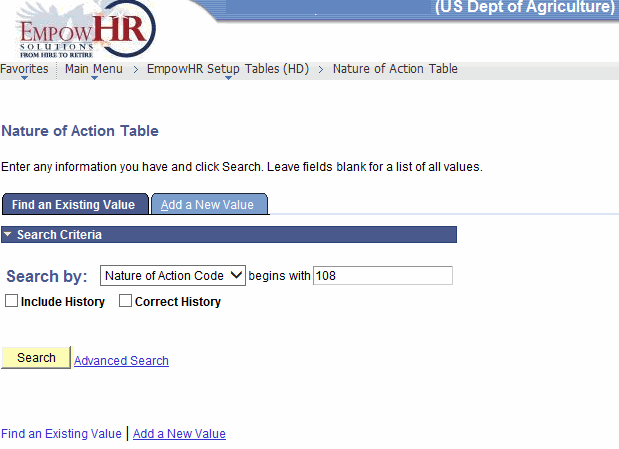
To Enter a Nature of Action Code:
- Select the menu group.
- Select the component. The Nature of Action Table page - Find an Existing Value tab is displayed.

- Enter the applicable search information.
- Click . The Nature of Action Table tab is displayed.
OR
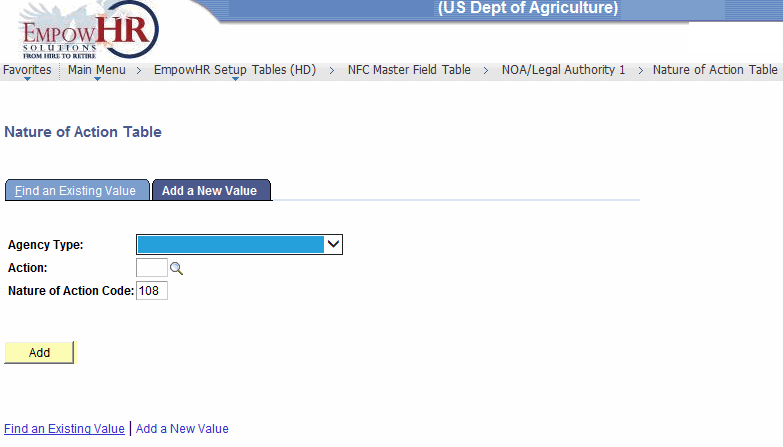
Select the tab. The Nature of Action Table page - Add a New Value tab is displayed.

- Complete the fields as follows:
Field
Instruction
Agency Type
Select the applicable Agency type from the drop-down list.
Action
Enter the three-alpha position action or search by clicking the search icon.
Nature of Action Code
Enter the three-numeric position NOAC.
- Click . The Nature of Action Table tab is displayed.

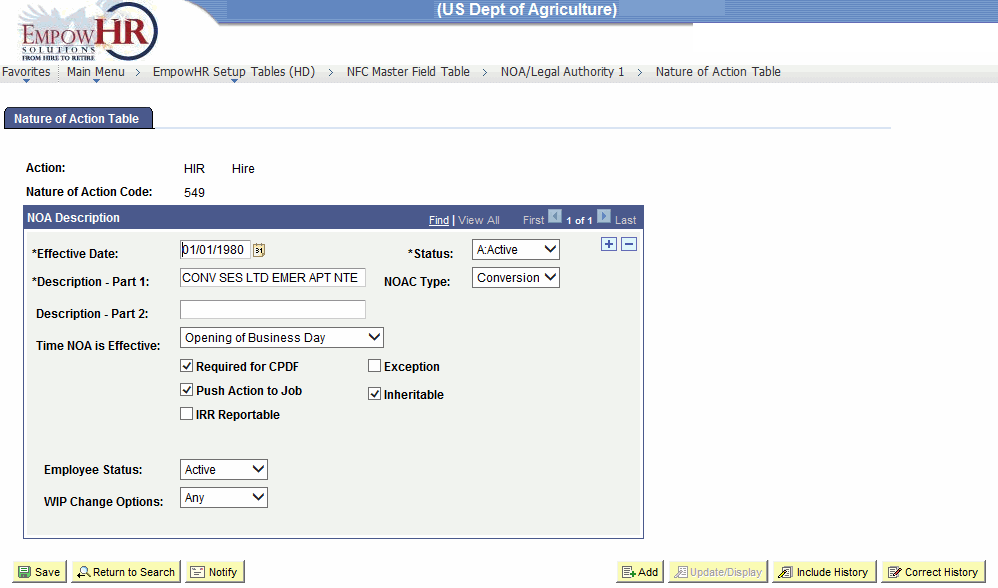
- Complete the fields as follows:
Field
Description/Instruction
Action
Populated based on the search criteria entered.
Nature of Action Code
Populated based on the search criteria entered.
NOA Description
Instruction
*Effective Date
Required field. Defaults to the current date. Enter a date or select a date from the calendar icon. This is the date on which a table row becomes effective; the date that an action begins. This date also determines when the user can view and/or change the information.
*Status
Required field. Populated based on the status of the transaction. The valid values are and .
*Description - Part 1
Required field. Enter the description of the NOAC.
NOAC Type
Click the down arrow to select the type of NOAC.
Description - Part 2
Enter the second part of the description of the NOAC, if applicable.
Time NOA Is Effective
Enter the time the NOAC is effective. The valid values are and .
Required For CPDF
Check this box if this NOAC is required for the employee's Central Personnel Data File (CPDF).
Exception
Check this box if this is an exception action.
Push Action to Job
Check this box if applicable.
Inheritable
Check this box if applicable.
IRR Reportable
Check this box if the internal rate of return (IRR) is reportable.
Employee Status
Click the down arrow to select the applicable status.
WIP Change Options
Click the down arrow to select the applicable work in progress (WIP) options.
- Click to save the document. At this point, the following options are available:
Step
Action
Click
Notifies the next individual in the workflow.
Click
Returns the user to the applicable page to add an additional NOAC.
Click
Returns the user to the applicable page to update the data entered.
Click
Includes history data.
Click
Returns the user to the applicable page to correct history data.
See Also |