|
|
|
|
|
Entering Time
allows users to enter T&A information for past, present, and future pay periods. Time entry for any pay period may be entered at any time, but must be signed and approved sequentially, otherwise the T&A will reject. For transaction code definitions, see the TNAINST procedure. To access this procedure, go to the page from the drop-down menu on the NFC homepage. Click the tab in the center ribbon. Select , then select .
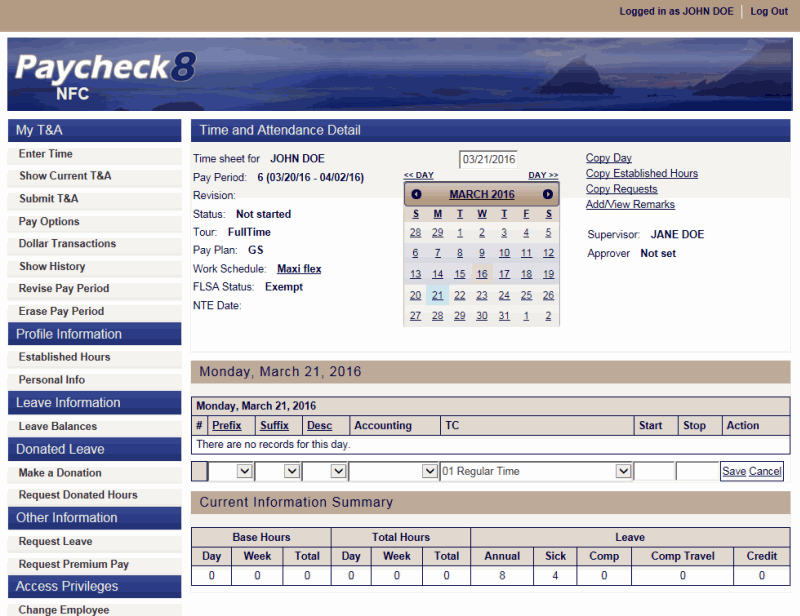
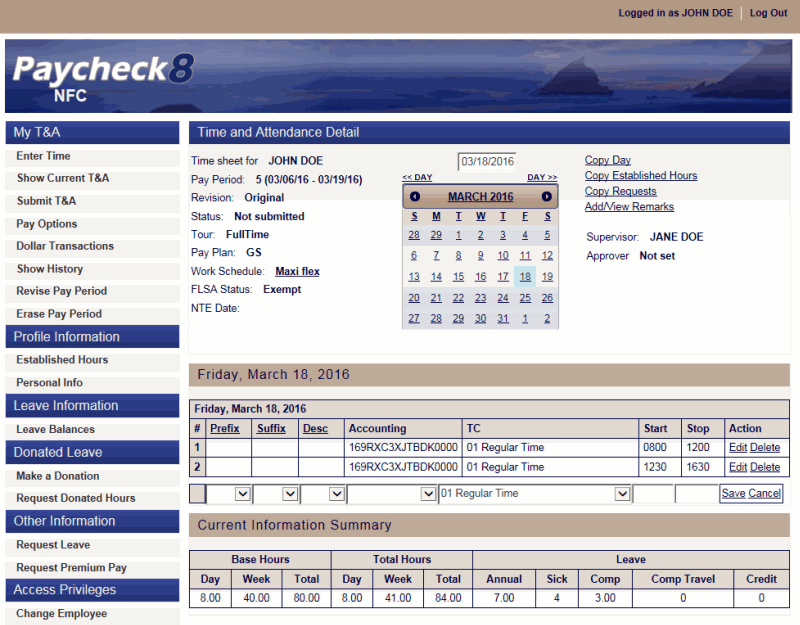
- Select from the My T&A menu on the Paycheck8 main menu page. The Time and Attendance Detail page is displayed and defaults to the current date.
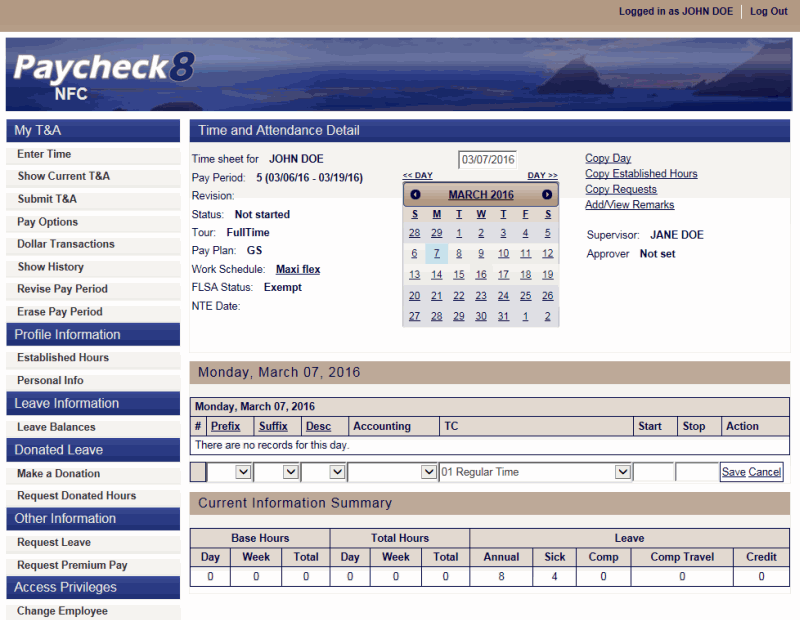
The fields displayed on this page reflect the data on file with Paycheck8 from NFC's daily feed. The fields and their descriptions are shown below.
Field
Description
Time sheet for
Displays the employee's name.
Day
Displays the current day. To change, type the applicable date, use the day arrows to scroll, or select the day from the calendar.
Month Year
Displays the current day. To change, click on the left facing arrow to view the preceding month or the right arrow to view a future month.
Pay Period
Displays the pay period.
Revision
Displays the revision of the T&A. Valid values are , , , etc.
Status
Displays the current status of the T&A. T&As can be edited at any time until the build pick-up, but must go through all five processes.
Valid values are:
Value
Definition
No data entered
Data entered, not submitted
Submitted for approval
Approved by supervisor
Completed and submitted for processing
Tour
Displays the employee's tour of duty.
Pay Plan
Displays the employee's pay plan.
Work Schedule
Displays the employee's work schedule. Click the work schedule value and select from the drop-down list to change the work schedule for the current pay period.
FLSA Status
Displays the employee's FLSA Status.
NTE Date
Displays the employee's not-to-exceed (NTE) date, if applicable.
Supervisor
Displays the employee's Supervisor.
Approver
Displays the employee's approver, if applicable. If no approver has been designated, is displayed.
- Complete the remaining fields as follows:
Field
Instruction
Prefix
Select the transaction code prefix from the drop-down list, if applicable. Prefixes are limited to special situations as defined for your Agency; only some transaction codes with prefix combinations are accepted; leave blank if not required.
Suffix
Select the transaction code suffix from the drop-down list, if applicable. Suffixes are limited to special situations as defined for your Agency; only some transaction codes with suffix combinations are accepted; leave blank if not required.
Desc
Select the transaction code Descriptor from the drop-down list, if applicable. Descriptor codes are limited to special situations as defined for your Agency. Only some transaction codes with descriptor combinations are accepted; leave blank if not required.
Accounting
Select the appropriate accounting code from the drop-down list. A valid accounting code is required on all time line entries. Accounting information is specific per Agency requirement and must be valid in MASC.
Select the applicable transaction code from the drop-down list. The transaction code must be consistent with your employment status, appointment, work schedule, tour, and pay plan.
Start
Enter the four-digit start time. The start time can range from to and must be at least 15 minutes prior to the associated stop time. Time must be entered in a minimum of quarter hours; the last two positions must be , , , or .
Stop
Enter the four-digit stop time. The stop time can range from to and must be at least 15 minutes after the associated start time. Time must be entered in a minimum of quarter hours; the last two positions must be , , , or .
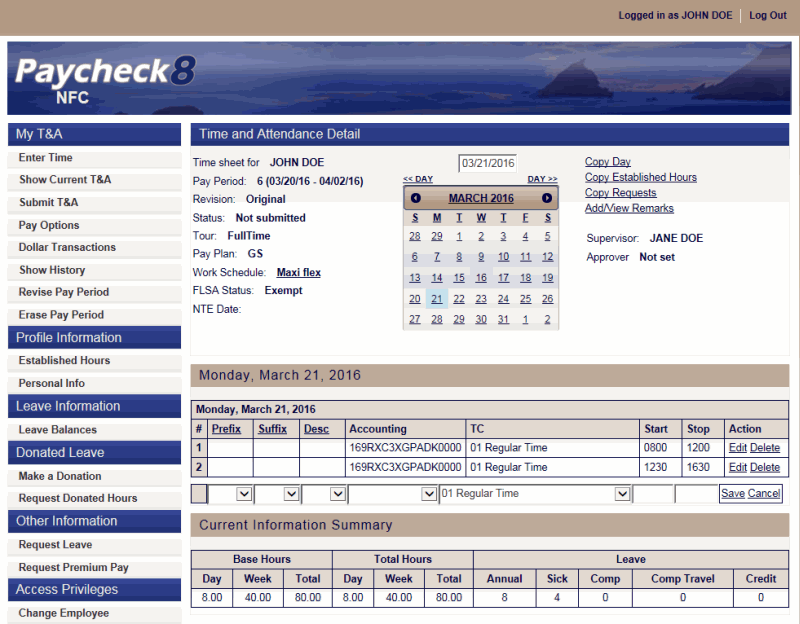
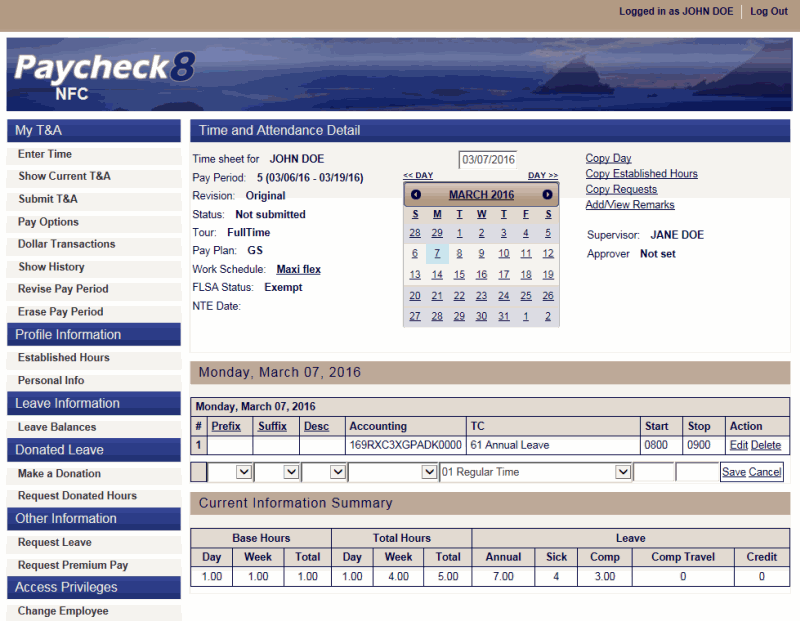
- Click in the Action field. If there are no errors, the entry line is saved.
OR
Click if you begin a time entry and realize that you do not wish to continue, or have made an error.
Once the first time entry has been saved on a T&A, the T&A is considered active and will be available for viewing.
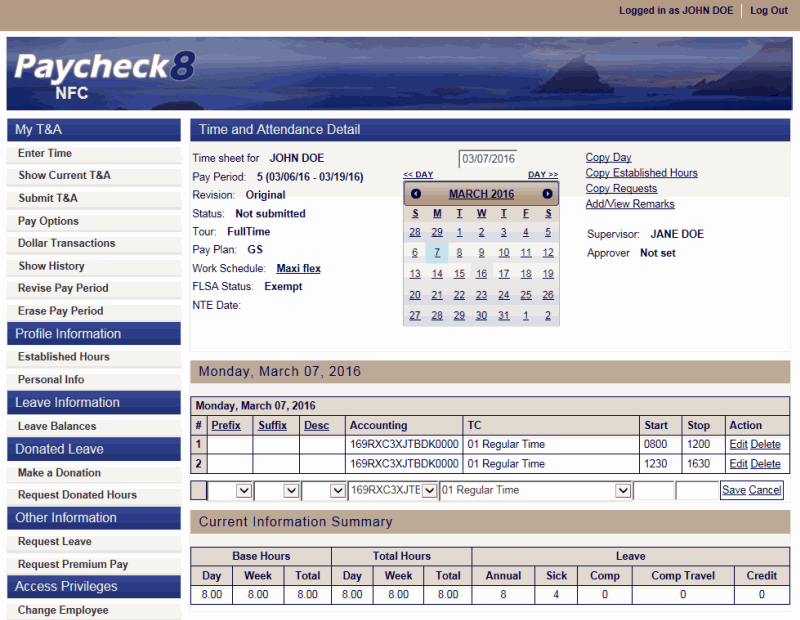
The Current Information Summary section contains summary information for the current pay period. These hours are updated as needed each time a Time Entry line is added, changed, or deleted.
The fields and descriptions are as follows:
Base Hours
Description
Day
Displays the base hours entered for the day.
Week
Displays the base hours entered for the week.
Total
Displays the total base hours entered for the pay period.
Total Hours
Description
Day
Displays the total hours entered for the day.
Week
Displays the total hours entered for the week.
Total
Displays the total hours entered for the pay period.
Leave
Description
Sick
Displays the sick leave hours available.
Comp
Displays the compensatory hours available.
Comp Travel
Displays the compensatory travel hours available.
Credit
Displays the credit hours available.
To Copy Days:
allows users to copy Established Hours on to other day(s) of the week within the current pay period. This process will overwrite any hours already recorded for the target day(s).
- Select from the My T&A menu on the Paycheck8 main menu page. The Time and Attendance Detail page is displayed and defaults to the current day in the current pay period.
- Click on the Time and Attendance Detail page. The Copy Hours page is displayed.
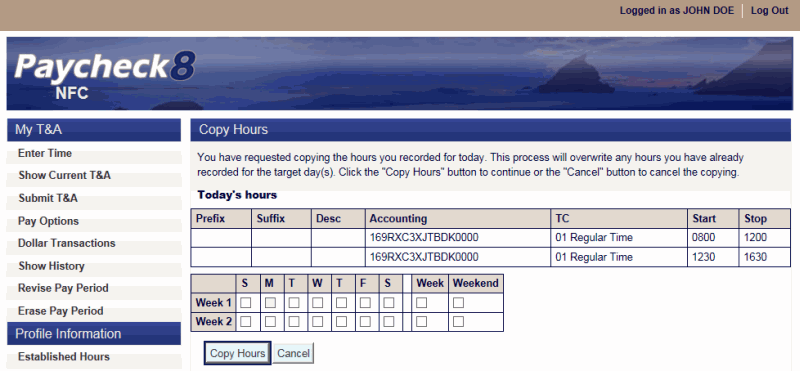
- Check the boxes of the days to be copied for Weeks 1 and 2.
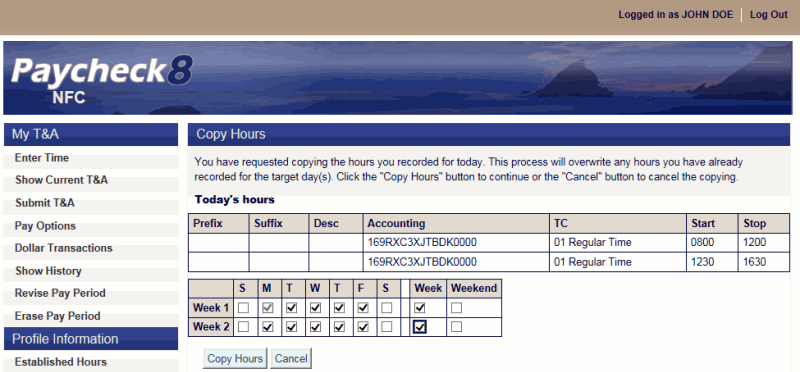
- Click . The Time and Attendance Detail is displayed showing the Current Information Summary with the total hours copied.

To Copy Established Hours:
allows users to copy Established Hours onto the T&A for the current pay period. This process will overwrite any hours already recorded on the T&A.
- Select from the My T&A menu on the Paycheck8 main menu page. The Time and Attendance Detail page is displayed and defaults to the current date.
- Click on the Time and Attendance Detail page. The Copy Established Hours page is displayed.

- Click . The Time and Attendance Detail is displayed showing the Current Information Summary with the total hours copied.
To Copy Requests:
allows users to copy leave and premium pay requests directly onto the T&A.
- Select from the My T&A menu on the Paycheck8 main menu page. The Time and Attendance Detail page is displayed and defaults to the current date.
- Click on the Time and Attendance Detail page. The Leave and Premium Pay Requests page is displayed.
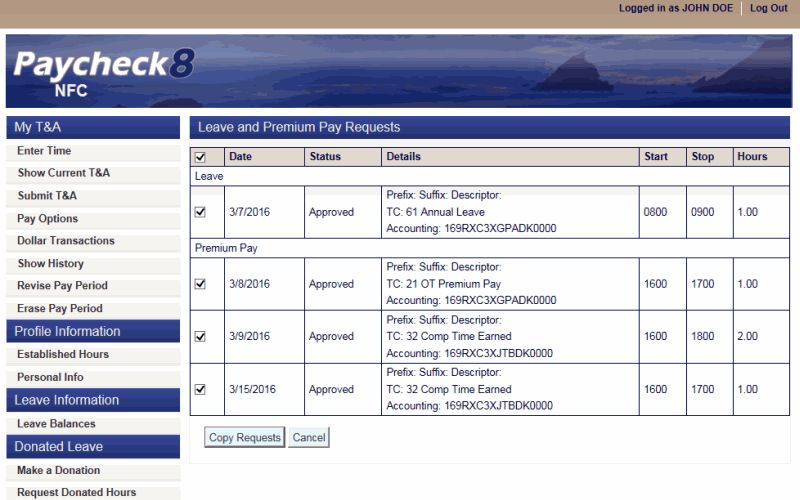
- Uncheck the box under Leave and Premium Pay requests to deselect all requests or uncheck any requests that you do not want copied.
- Click . The leave and premium pay requests are copied onto the applicable days.
To Add/View Remarks:
allows users to add remarks to the supervisor regarding the T&A.
- Select from the My T&A menu on the Paycheck8 main menu page. The Time and Attendance Detail page is displayed and defaults to the current date.
- Click on the Time and Attendance Detail page. The Time and Attendance Detail page is displayed with the Remarks section active.
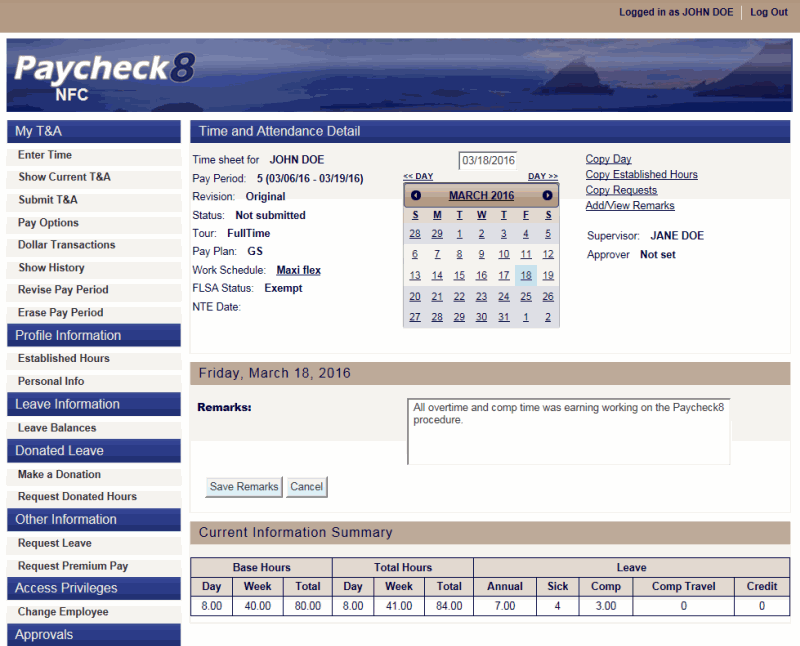
- Enter applicable remarks.
- Click . Remarks will show in Remarks section on the T&A.
See Also |