|
|
|
|
|
Add a Person
The component allows the user to add people in EmpowHR. It will enable the user to add people with jobs (employees, contingent workers, and persons of interest with job data), as well as persons of interest without job data. A person identification (ID) is assigned automatically, which allows EmpowHR to generate IDs sequentially as new people are added.
To Add a Person:
- On the EmpowHR Main Menu page, select the menu group.
- Select the menu.
- Select the menu item.
- Select the component. The Add Person tab is displayed.
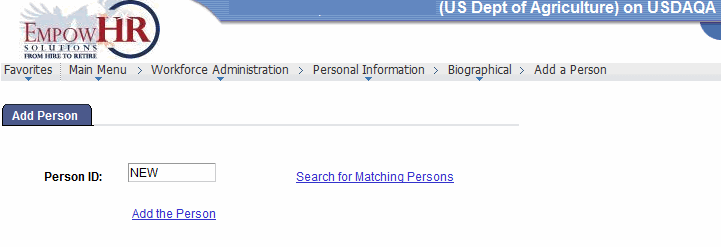
- Complete the field as follows:
Field
Description/Instruction
Person ID
Populated with the system-assigned ID when you are adding a new person. The value will display as until the record is saved.
- Click the link. The Add a Person page - Biographical Details tab is displayed.
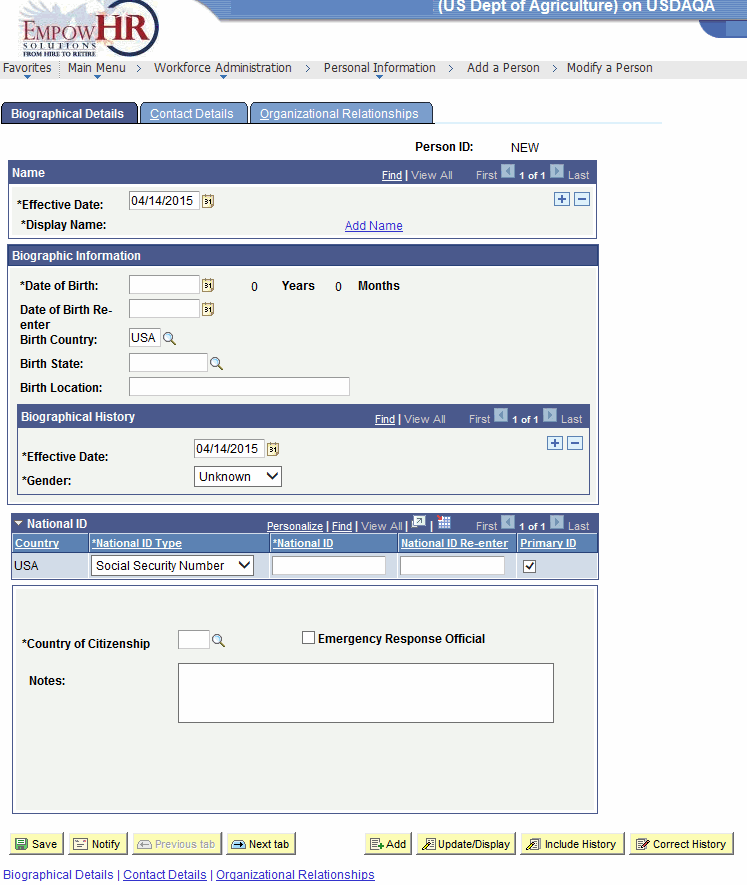
- Complete the fields as follows:
Field
Description/Instruction
Person ID
Populated with the system-generated Person ID.
Name
Description/Instruction
*Effective Date
Required field. Enter the effective date of the action or select a date by clicking the calendar icon. The date entered or selected will be populated in the Personnel Action Request (PAR) section.
*Display Name
Required field. Populated with data entered from the link. See field instructions for Add a Name. The name entered on this link will be populated in the PAR section.
Biographic Information
Description/Instruction
*Date of Birth
Required field. Enter the person’s date of birth or select a date by clicking the calendar icon. The calculated age is displayed to the right of the field. If this field is left blank, a warning message appears when the record is saved. This information is used to calculate a person’s age in some tasks, such as the expected retirement date, based on the person’s age. The date entered or selected will be populated in the PAR section.
Years
Populated based upon data entered on the *Date of Birth field.
Months
Populated based upon data entered on the *Date of Birth field.
Date of Birth Re-enter
Reenter the date of birth entered on the previous field. If you leave this field blank, an error message will appear.
Birth Country
Enter the birth country or select a country by clicking the search icon. Based on the selected country, the system may display additional fields. The birth country entered or selected will be populated in the PAR section.
Birth State
Enter the birth State or select a State by clicking the search icon. The birth State entered or selected will be populated in the PAR section.
Birth Location
Enter the birth location. Usually a city, town, or village. The birth location entered will be populated in the PAR section.
Biographical History
Instruction
Date
Required field. Enter the effective date or select a date by clicking the calendar icon.
*Gender
Required field. Select the applicable gender from the drop-down list. Valid values are , , and . The gender selected in this field will be populated in the PAR section.
National ID
Description/Instruction
Country
Populated with USA.
*National ID Type
Required field. Defaults to the SSN and cannot be changed.
*National ID
Required field. Enter the SSN. The SSN entered here will be populated in the PAR section.
National ID Re-enter
Reenter the SSN.
Primary ID
Check this box if this ID is the person’s primary ID. If this is the only data row for this person, the box is checked by default.
*Country of Citizenship
Required field. Enter the three-position country code or click the search icon to search for the applicable country.
Emergency Response Official
Check this box if the person being added is an emergency response official. The system defaults to blank.
Notes
Enter any notes, if applicable.
- Select the tab. The Add a Person page - Contact Details tab is displayed.
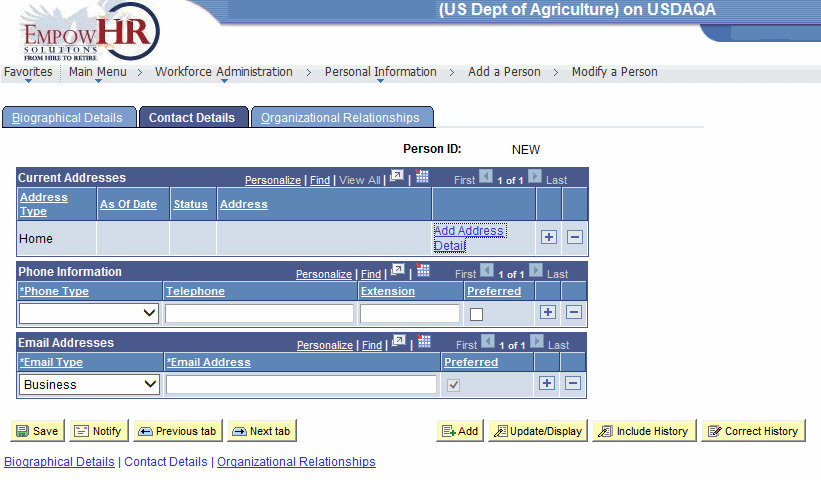
- Complete the fields as follows:
Field
Description/Instruction
Person ID
Populated with the system-generated Person ID.
Current Addresses
Description/Instruction
Address Type
Select the type of address that appears in this row. The field is populated with for the first address entered. Click to select additional address types and add additional addresses.
As Of Date
Populated with the information entered from the link. See field instructions for Add Address Detail.
Status
Populated with the information entered from the link. See field instructions for Add Address Detail.
Address
Populated with the information entered from the link. See field instructions for Add Address Detail.
Add Address Detail
Click this link to display the Address History page to add/edit any address information. For more information, see Add Address Detail.
Phone Information
Instruction
*Phone Type
Required field. Select the applicable phone type that corresponds with the telephone number. Select to designate a phone number as the individual’s primary contact number. The phone type selected in this field will be populated in the PAR section.
Telephone
Enter the telephone number. The telephone number entered in this field will be populated in the PAR section.
Extension
Enter the extension if applicable. The extension data entered here will be populated in the PAR section.
Preferred
Check this box if this is the person’s preferred phone number. If this box is checked, it will be populated next to the applicable phone information in the PAR section.
Email Addresses
Instruction
*Email Type
Required field. Select the email type from the drop-down list. Click to select additional email address types and add additional email addresses.
*Email Address
Required field. Enter the email address.
Preferred
Check this box if this is the person’s preferred email address.
- Select the tab. The Add a Person page - Organizational Relationships tab is displayed.
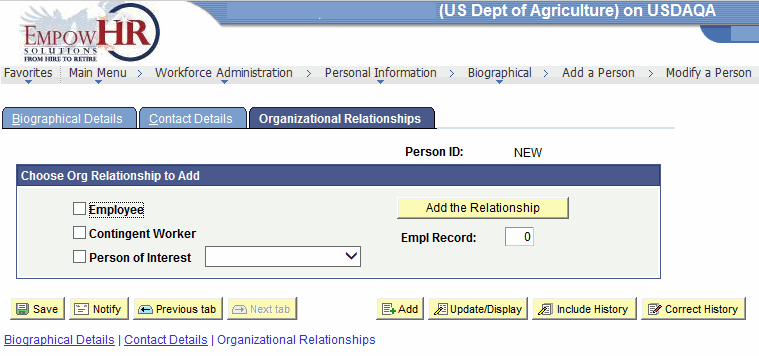
At this point, you must establish the organizational relationship of the new person. To establish the organizational relationship, see Establishing an Organizational Relationship.
At this tab, the following options are available:
Step
Description
Check the box
Establishes an employee relationship. For more information, see Employee.
Check the box
Establishes a contingent worker relationship. For more information, see Contingent Worker.
Check the box
Establishes a person of interest relationship. For more information, see Person of Interest with Job Data or Person of Interest without Job Data.
- Click . The person's relationship to the organization is added.
At this point, the following options are available:
Step
Description
Click
Saves the record.
Click
Notifies the next individual in the workflow.
Click
Views the data on the previous tab.
Click
Views the data on the next tab.
Click
Returns the user to the applicable page to add data.
Click
Returns the user to the applicable page to update the data entered.
Click
Includes historical data.
Click
Returns the user to the applicable page to correct history data.
See Also |