Forms and Reports Selection
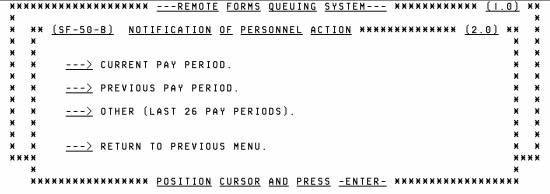
Each option at the RFQS menu provides a submenu that lists all forms or reports in that option. Each submenu has a pay period selection screen that provides the current pay period, previous pay period, and other pay period to be used for selecting output.
Use the instructions below for these forms.
To Select This option:
- to the Forms menu.
- Press . The Pay Period Selection screen is displayed.

- View the description of each option listed on the Pay Period Selection screen.
Field
Description
Current Pay Period.
Refers to the most recently processed pay period.
Previous Pay Period.
Refers to the pay period prior to the current pay period.
Other (Last 26 Pay Periods).
Used to select a pay period prior to the previous pay period.
Return to Previous Menu.
Used to return to the Forms menu.
- to the option desired.
- Press . The appropriate option name appears on each screen.
Selecting the Other Option:
- to the Other (Last 26 Pay Periods) option, from the Pay Period Selection screen.
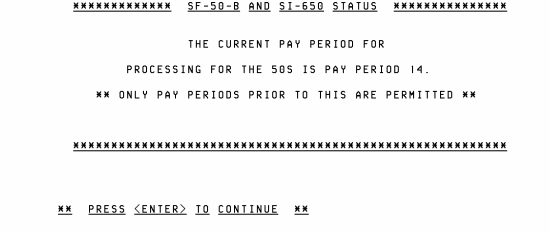
- Press . The Pay Period Status screen is displayed showing the current pay period for processing.

- Press to continue. The Pay Period Entry screen is displayed.

- the applicable pay period.
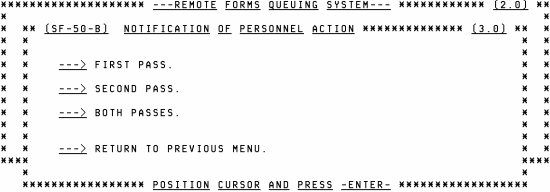
- Press . The Selection Criteria screen is displayed except when the SF 50-B is selected. The Pass Selection screen is displayed only after selecting the SF 50-B.

A pass is a system processing cycle which updates the SF 50 B files. Below is a description of each pass.
Field |
Description |
|---|---|
First Pass |
Usually runs on the first Sunday following the end of a pay period. |
Second Pass |
Usually runs on the second Sunday following the end of a pay period. This pass prints the SF 50-Bs processed in the system. |
Both Passes |
Used to request SF 50 Bs for both passes described above. |
To Select an Option From the Pass Selection Screen:
- to the applicable option.
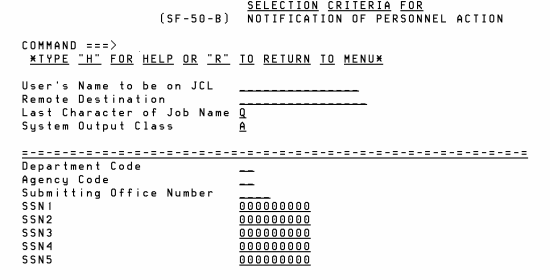
- Press. The Selection Criteria for SF-50-B Notification of Personnel Action screen is displayed.

- Complete the fields as follows:
Field
Instruction
Command
Type for the Help screen or to return to the RFQS menu. to the next field.
User's Name To Be on JCL
Type the user's name or other information to identify the report destination.
Remote Destination
Type the printer identifier where the form is to be printed.
Last Character of Job Name
Type any letter () or number () to identify this report from others being specified. This character becomes the last character of the job name. If no entry is made, the system defaults to .
It is recommended that a unique six-digit job-name character be entered whenever the possibility exists that more than one report will be requested. If a character is not entered and the system defaults to , when two reports are requested, both jobs would have the same job name. Since duplicate jobs cannot execute at the same time, one job would have to be completed before the system could start executing the other job. If the reports were given different job names, they could be executing simultaneously.
System Output Class
Type to generate a hard copy at the designated printer or t o hold output for viewing at the terminal. For instructions on viewing a report before printing, see the ISPF procedure which is available online at the NFC Web site. To view and/or print this procedure, select from the drop-down menu on the NFC homepage. At the HR and Payroll Client page, select the tab in the center ribbon. Select the ISPF manual located under the Reporting publication category. If no entry is made, the system defaults to .
Number of Copies
Type the number of reports needed (). If no entry is made, the system defaults to .
Department Code
Type the Department code.
Agency Code
Type the Agency code.
Submitting Office Number
Type the POI.
Org Structure Level 2
Type the second level of the organizational structure code.
Org Structure Level 3
Type the third level of the organizational structure code.
Org Structure Level 4
Type the fourth level of the organizational structure code.
SSN
Type up to three employee social security numbers (SSN). To print all SF 1150s of the requested pay period, leave the SSN fields blank
- Press to submit the job for output, after completing the applicable fields. The RFQS menu is displayed.
- Select the appropriate menu and proceed as described, to request another form.