Creating Employee Profiles
allows HR Administrators the ability to create an employee profile. This function should be used in only extreme circumstances. The preferred way for profile creation is from the NFC daily feed file.
To Create an Employee Profile:
- Select from the Administration menu on the Paycheck8 main menu page. The Employee Management page is displayed.

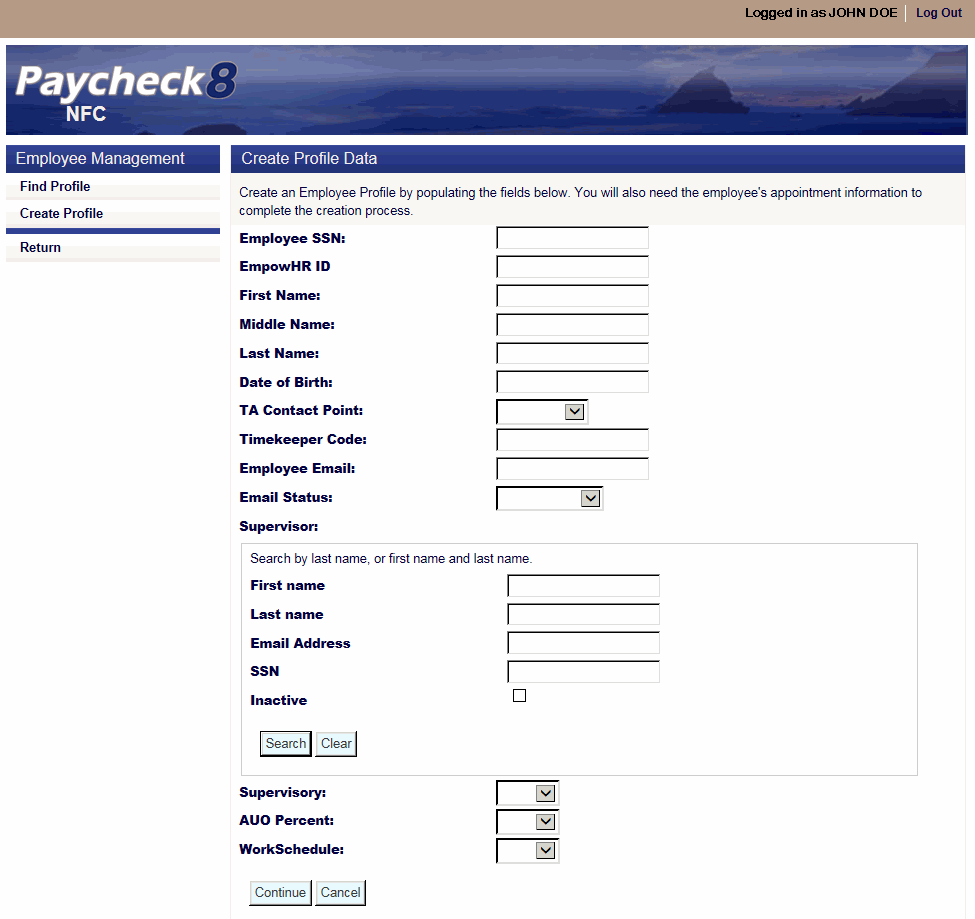
- Select . The Create Profile Data page is displayed.

- Complete employee profile data fields as follows:
Field
Instruction
Employee SSN
Enter the employee's SSN.
EmpowHR ID
Not applicable.
First Name
Enter the employee's first name.
Middle Name
Enter the employee's middle name.
Last Name
Enter the employee's last name.
Date of Birth
Enter the employee's date of birth.
TA Contact Point
Enter the employee's T&A contact point.
Timekeeper Code
Enter the employee's timekeeper code.
Employee Email
Enter the employee's email address.
Email Status
Set by the application for all users to receive emails. Can be modified by the HR Administrator from the drop-down menu to stop emails.
Supervisor
Search by last name, or first name and last name.
Instruction
First name
Optional
Enter the supervisor's first name.
Last name
Enter at least two characters of the supervisor's last name.
Email Address
Optional
Enter the supervisor's email address.
SSN
Optional
Enter the supervisor's SSN.
Inactive
Click this box if you want to search inactive employees.
- Click . A list of employees matching the search criteria is displayed.

- Click next to the applicable supervisor. The supervisor field is now populated with the supervisor's name.
- Complete remaining employee profile data fields as follows:
Field
Instruction
Supervisory
Select the supervisory status of the employee from the drop-down list. Valid values are and
AUO Percent
Select the AUO percentage that the employee is allowed to earn from the drop-down list, if applicable. Valid values are , , , , , and .
Work Schedule
Select the employee's work schedule from the drop-down list. Valid values are:
Value
Meaning
Four 10-hour workdays per workweek
Nine workdays (eight 9-hour days and one 8-hour day)
First 40 hours of work performed in a week define the tour of duty for that pay period
Variable workday hours within a 40-hour workweek
An irregular number of hours or days for which there is no prearranged scheduled tour of duty
Variable workweek hours within an 80-hour pay period
No defined schedule.
Five 8-hour workdays within a 40-hour workweek
Variable workday hours within a 40-hour week.
Variable workweek hours within an 80-hour pay period
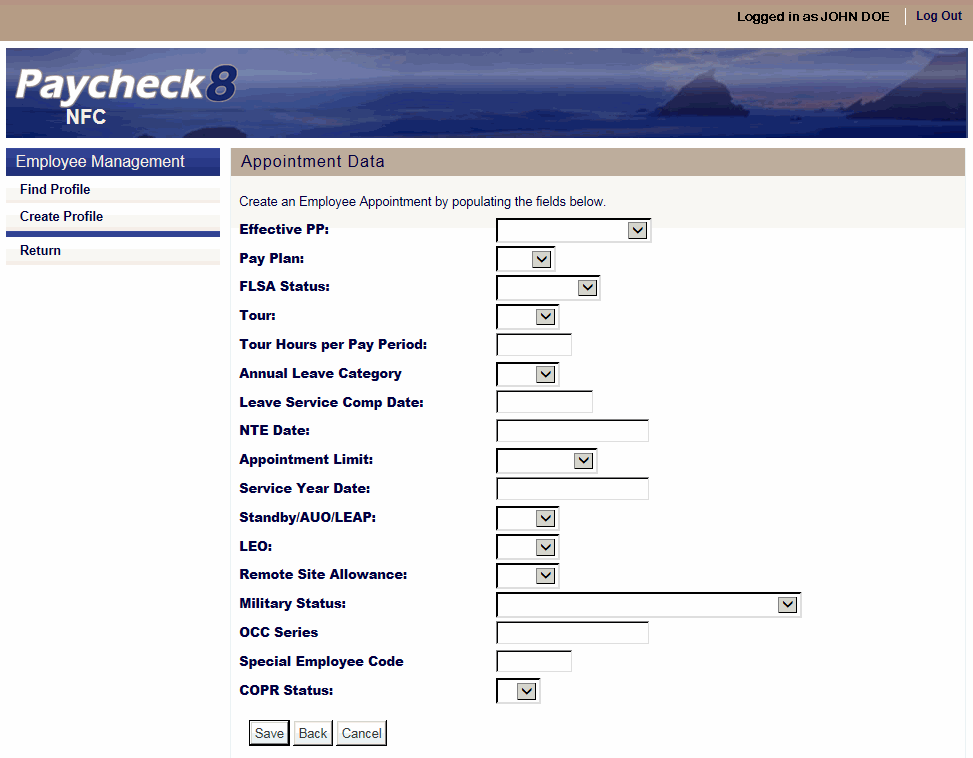
- Click . The Appointment Data page is displayed.

- Complete the appointment data fields as follows:
Field
Instruction
Effective PP
Select the effective pay period for the appointment from the drop-down list.
Pay Plan
Select the Pay Plan from the drop-down list.
FLSA Status
Select the FLSA Status from the drop-down list. Valid values are and .
Tour
Select the employee's tour from the drop-down list.
Tour Hours per Pay Period
Enter the tour of duty hours per pay period.
Annual Leave Category
Select the Annual Leave Category from the drop-down list. Valid values are , , and .
Leave Service Comp Date
Enter the employee's Service Computation Date for leave or select the date from the calendar.
NTE Date
Enter the employee's NTE Date or select the date from the calendar, if applicable.
Appointment Limit
Select the employee's Appointment Limitation, if applicable. Valid values are , , , and .
Service Year Date
Enter the employee's Service Year Date or select the date from the calendar.
Select or from the drop-down list indicating whether or not the employee is entitled to earn standby pay, AUO, or Law Enforcement Availability Pay (LEAP). Standby/AUO/LEAP are hours and pay differential entitlements for employees who receive premium pay on an annual basis for administratively uncontrollable overtime or regularly scheduled standby duty.
Select whether or not the employee is a Law Enforcement Officer. Valid values are , , and .
Remote Site Allowance
Select or from the drop-down list indicating whether or not the employee is entitled to a remote site allowance.
Military Status
Select the employee's military status from the drop-down list.
OCC Series
Enter the occupational series of the employee.
Special Employee Code
Enter the employee's Special Employee Code.
COPR Status
Not applicable.
- Click . The message is displayed.

See Also |