Contingent Worker
A contingent worker organizational relationship is established when the relationship of the person who provides services to an organization is under terms specified in a contract on a non-permanent basis.
To Add a Contingent Worker:
- On the EmpowHR Main Menu page, select the menu group.
- Select the menu.
- Select the menu item.
- Select the component. The Add Person tab is displayed.
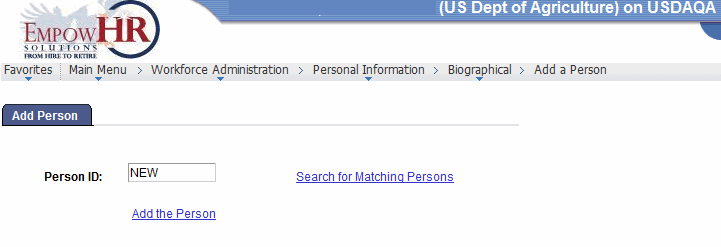
- Complete the field as follows:
Field
Description/Instruction
Person ID
Populated with the system-assigned ID when you are adding a new person. The value will display as until the record is saved.
- Click the link. The Add a Person page - Biographical Details tab is displayed.
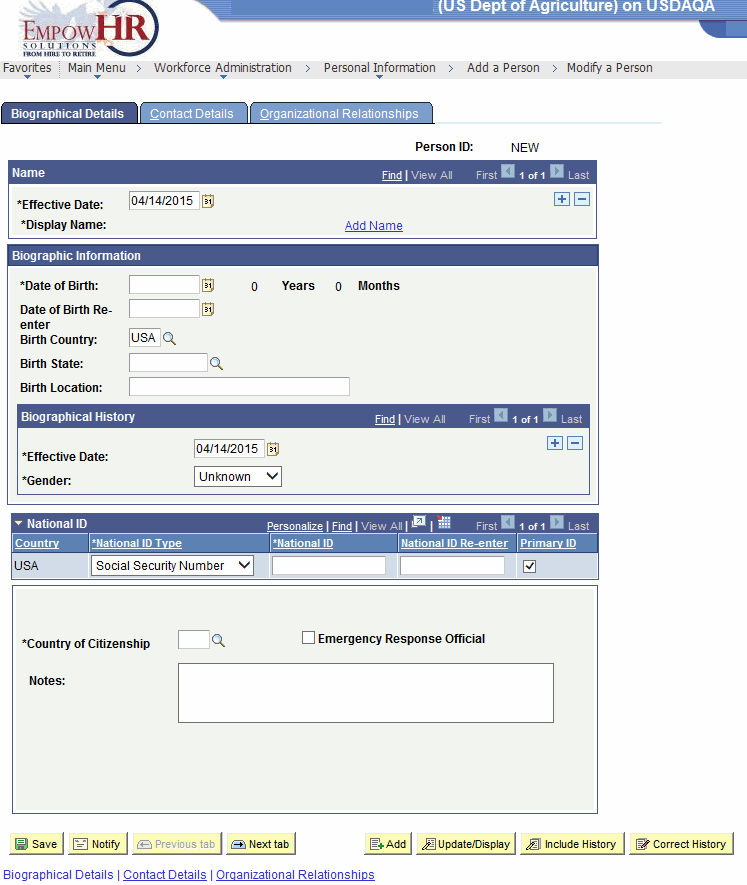
- Complete the fields as follows:
Field
Description/Instruction
Person ID
Populated with the system-generated Person ID.
Name
Description/Instruction
*Effective Date
Required field. Enter the effective date of the action or select a date by clicking the calendar icon. The date entered or selected will be populated in the Personnel Action Request (PAR) section.
*Display Name
Required field. Populated with data entered from the link. See field instructions for Add a Name. The name entered on this link will be populated in the PAR section.
Biographic Information
Description/Instruction
*Date of Birth
Required field. Enter the person’s date of birth or select a date by clicking the calendar icon. The calculated age is displayed to the right of the field. If this field is left blank, a warning message appears when the record is saved. This information is used to calculate a person’s age in some tasks, such as the expected retirement date, based on the person’s age. The date entered or selected will be populated in the PAR section.
Years
Populated based upon data entered on the *Date of Birth field.
Months
Populated based upon data entered on the *Date of Birth field.
Date of Birth Re-enter
Reenter the date of birth entered on the previous field. If you leave this field blank, an error message will appear.
Birth Country
Enter the birth country or select a country by clicking the search icon. Based on the selected country, the system may display additional fields. The birth country entered or selected will be populated in the PAR section.
Birth State
Enter the birth State or select a State by clicking the search icon. The birth State entered or selected will be populated in the PAR section.
Birth Location
Enter the birth location. Usually a city, town, or village. The birth location entered will be populated in the PAR section.
Biographical History
Instruction
Date
Required field. Enter the effective date or select a date by clicking the calendar icon.
*Gender
Required field. Select the applicable gender from the drop-down list. Valid values are , , and . The gender selected in this field will be populated in the PAR section.
National ID
Description/Instruction
Country
Populated with USA.
*National ID Type
Required field. Defaults to the SSN and cannot be changed.
*National ID
Required field. Enter the SSN. The SSN entered here will be populated in the PAR section.
National ID Re-enter
Reenter the SSN.
Primary ID
Check this box if this ID is the person’s primary ID. If this is the only data row for this person, the box is checked by default.
*Country of Citizenship
Required field. Enter the three-position country code or click the search icon to search for the applicable country.
Emergency Response Official
Check this box if the person being added is an emergency response official. The system defaults to blank.
Notes
Enter any notes, if applicable.
- Select the tab. The Add a Person page - Contact Details tab is displayed.
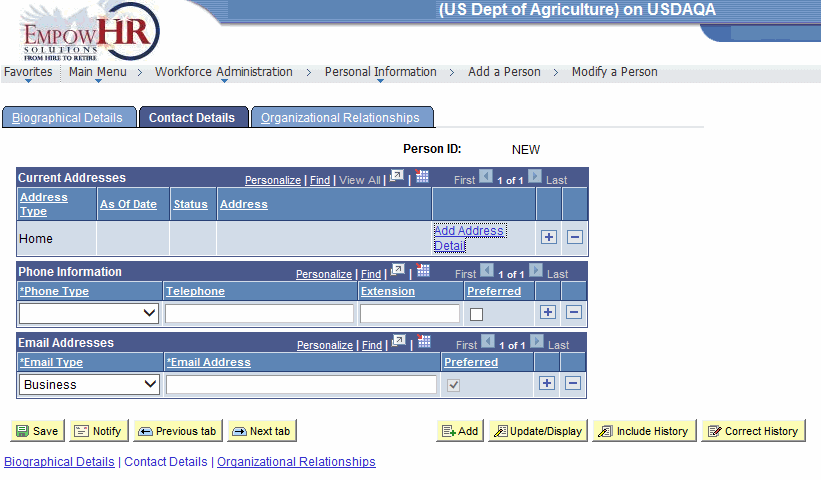
- Complete the fields as follows:
Field
Description/Instruction
Person ID
Populated with the system-generated Person ID.
Current Addresses
Description/Instruction
Address Type
Select the type of address that appears in this row. The field is populated with for the first address entered. Click to select additional address types and add additional addresses.
As Of Date
Populated with the information entered from the link. See field instructions for Add Address Detail.
Status
Populated with the information entered from the link. See field instructions for Add Address Detail.
Address
Populated with the information entered from the link. See field instructions for Add Address Detail.
Add Address Detail
Click this link to display the Address History page to add/edit any address information. For more information, see Add Address Detail.
Phone Information
Instruction
*Phone Type
Required field. Select the applicable phone type that corresponds with the telephone number. Select to designate a phone number as the individual’s primary contact number. The phone type selected in this field will be populated in the PAR section.
Telephone
Enter the telephone number. The telephone number entered in this field will be populated in the PAR section.
Extension
Enter the extension if applicable. The extension data entered here will be populated in the PAR section.
Preferred
Check this box if this is the person’s preferred phone number. If this box is checked, it will be populated next to the applicable phone information in the PAR section.
Email Addresses
Instruction
*Email Type
Required field. Select the email type from the drop-down list. Click to select additional email address types and add additional email addresses.
*Email Address
Required field. Enter the email address.
Preferred
Check this box if this is the person’s preferred email address.
- Select the tab. The Add a Person page - Organizational Relationships tab is displayed.
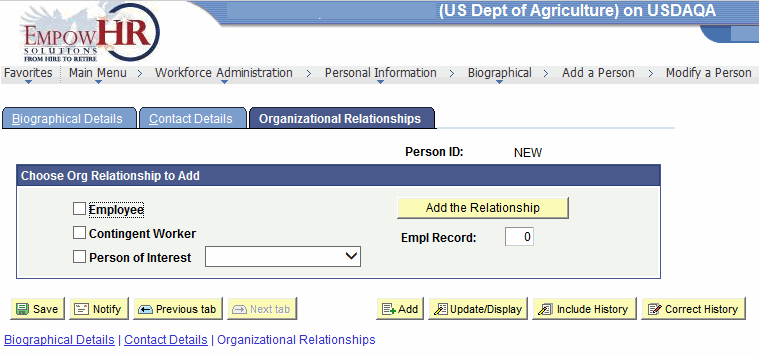
- On the Add a Person page - Organizational Relationships tab, check the box. The Add a Person page - Work Location tab is displayed.
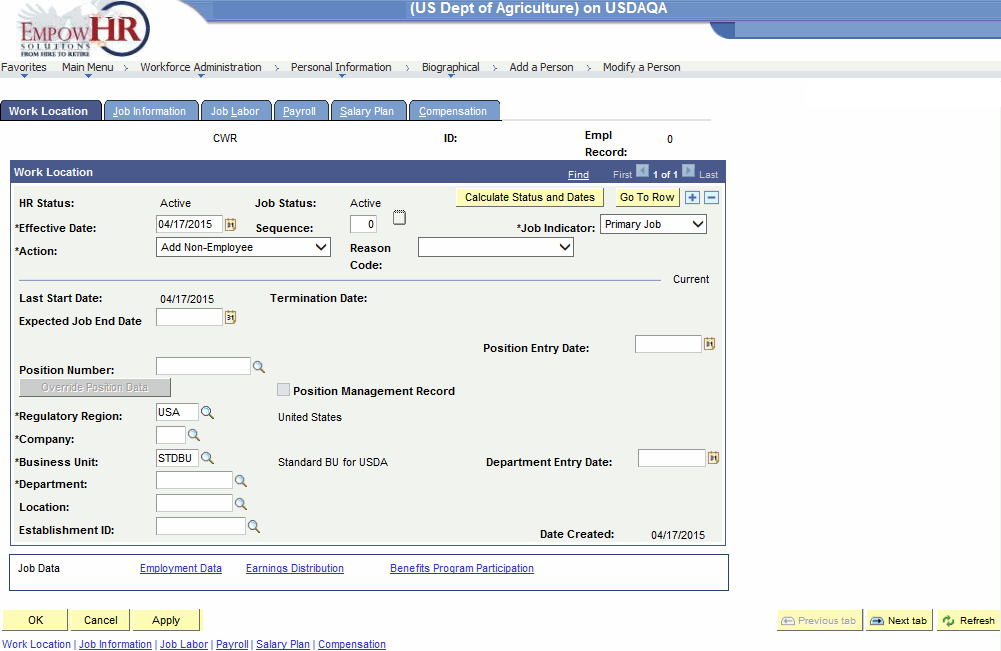
- Complete the fields as follows:
Field
Description/Instruction
ID
Populated with the system-generated ID.
Empl Record
System generated with the employee record number (appointment number) for the person.
Work Location
Description/Instruction
HR Status
System generated with the person's human resources (HR) status (i.e., for an active worker).
Job Status
System generated with the person's job status (i.e., for an active worker).
*Effective Date
Required field. Enter the effective date or select a date by clicking the calendar icon. When a new instance with the action of Hire is added, the effective date entered becomes the original hire date.
Sequence
Use this number to track multiple administrative actions that occur on the same day. The default value is , the correct number for new instances.
*Job Indicator
Required field. Select the applicable job indicator from the drop-down list. Valid values are , , and . This field is used to process people with more than one organizational instance in a single organizational relationship.
*Action
Required field. Select the action requiring you to create or modify this record from the drop-down menu. The system displays a default value when a new employment, contingent worker, or POI instance is created.
Reason Code
Select the reason requiring you to create or modify this record from the drop-down menu. EmpowHR displays a default value when a new employment, contingent worker, or POI instance is created. The valid values for this field will vary based on the user’s Agency and access level.
Last Start Date
Enter the most recent start date for this organizational instance.
Termination Date
Populated with the day before the termination effective date.
Expected Job End Date
Enter the expected job end date for this job or select a date by clicking the calendar icon.
If this job is a temporary assignment and a date is not entered here, a Temporary Assignment without End Date report can be ran to identify those assignments that do not have an end date. This date is necessary if you want the system to terminate this job and reactivate any substantive job that may be on hold.
The system displays the day before the termination effective date as the termination date.
Position Entry Date
Populated with the effective date based on the position number entered for this person. The data can be overridden by clicking .
Position Number
Enter the position number or select a number by clicking the search icon. The available entry or selection of the position number is dependant on the person type relationship.
Define positions in the component in . Completing this field allows EmpowHR to complete position-related fields in the component with default data from the component, including job code, Department, location, supervisor level, reports to, and full-time or part-time status. The corresponding fields become unavailable for entry.
A warning message will appear if a person is assigned to a position that is already filled and if the new appointment exceeds the maximum head count for that position. The system calculates the head count and displays the appropriate indicator in the Open//Filled field in the component when assignments are changed.
Position Management Record
Selected when changes are made to fields in the component that initiate a system update of fields here. When this box is selected, it indicates that the system inserts a data row on the Job Data pages.
*Regulatory Region
Required field. Populated based on the regulatory region specified for the position this person is associated with. The data can be overridden by clicking .
If the person is not assigned to a position, this field is populated with the regulatory region for the person, based on the user preferences. This entry can be overridden.
*Company
Required field. Populated based on the Department (i.e., Agriculture) specified for the position associated with this person and cannot be modified. The data can be overridden by clicking .
Populated with a default Department code if the person is not assigned to a position, but a company is assigned to a Department in the Department table.
If no company is designated on the Department table, enter a company or select a company by clicking the search icon.
*Business Unit
Required field. Populated based on the business unit specified for the position associated with this person and cannot be modified. The data can be overridden by clicking .
Populated with a default business unit if the person is not assigned to a position. The default can be overridden.
Department Entry Date
System generated.
*Department
Required field. Populated based on the position number entered.
Location
Populated based on the position number entered.
Establishment ID
Enter the establishment ID or select an ID by clicking the search icon.
Date Created
System generated.
- Click to calculate the person’s HR, job, or payroll status and the employment dates so that the changes can be reviewed before the component is saved. This button is displayed when changes are made to the effective date or to one of the status fields.
- Click to enter exceptions to the default position data for this person. This opens up the unavailable fields, including Job Code and Depart; entries in these fields can be overridden. For example, the worker might have a higher salary grade than the standard grade that is associated with the position. When Override Position Data is clicked, the button becomes , and vice versa. This button is available only on new rows of data.
- Select the tab. The Add a Person page - Job Information tab is displayed.
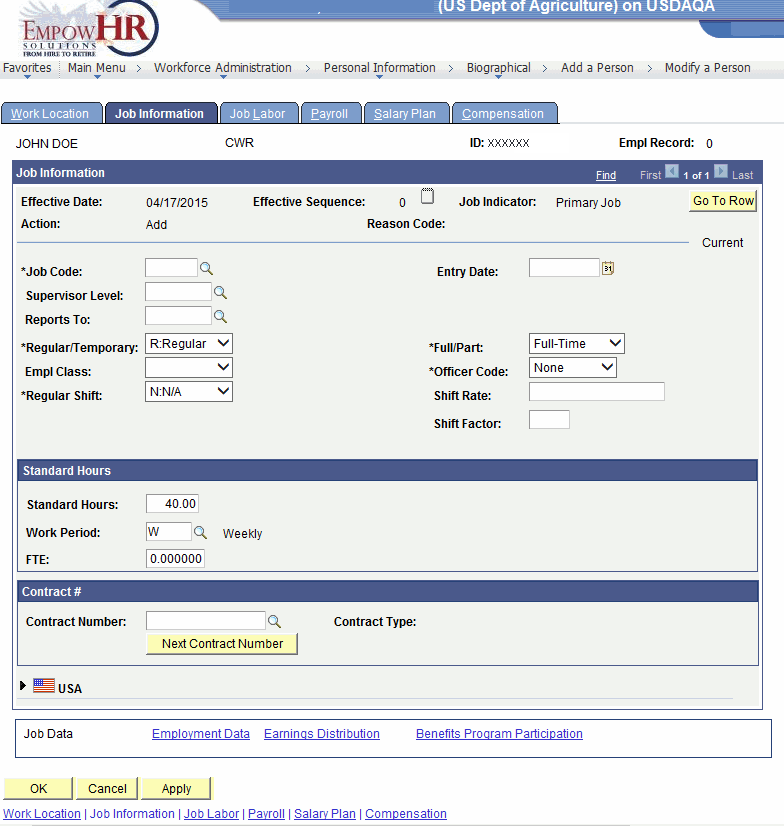
- Complete the fields as follows:
Field
Description/Instruction
ID
Populated with the system-generated ID.
Empl Record
Populated with the employee record number (appointment number) for the person.
Job Information
Description/Instruction
Effective Date
Populated based on the data selected on the tab.
Effective Sequence
System generated.
Job Indicator
Populated based on the data selected on the tab.
Action
Populated based on the data selected on the tab.
Reason Code
Populated based on the data selected on the tab.
*Job Code
Required field. Populated based on the job code specified for the position associated with this person, the system enters a default job code and cannot be modified. The data can be overridden by clicking on the Work Location tab.
If the person is not assigned to a position, enter the job code or select a code by clicking the search icon.
Entry Date
Populated with the date on which the person is first assigned to this job code. If you are using position management, this field cannot be modified. The data can be overridden by clicking on the tab.
Supervisor Level
If the person is not assigned to a position, enter the supervisor level or select a level by clicking the search icon.
Supervisor levels are a class of positions that represent levels of some managerial or supervisory significance and can be used as another type of employee identifier.
If a specified supervisor level of this position is associated with this person, the system enters a default supervisor level and this field cannot be modified. The data can be overridden by clicking on the Work Location tab.
Reports To
Displays the position number, title, and name of the manager associated with this position.
If a specified "reports to" number for this position is associated with this person, the system enters a default value and this field cannot be modified. The data can be overridden by clicking on the tab.
If the person is not assigned to a position and is assigned a reports to ID to a Department in the Department Table, a default reports to ID appears.
If the person is not assigned to a position, enter the reports to ID or select an ID by clicking the search icon.
*Regular/Temporary
Required field. Populated based on the position number entered or selected and cannot be modified. The data can be overridden by clicking on the tab.
*Full/Part
Required field. Populated based on the position number entered or selected and cannot be modified. The data can be overridden by clicking on the tab.
If the person is not assigned to a position, select the applicable value from the drop-down menu. Valid values are and .
Empl Class
Select the employee class from the drop-down list.
*Officer Code
Required field. Select the Officer Code from the drop-down list.
*Regular Shift
Required field. Populated based on the position number associated with the person and cannot be modified. The data can be overridden by clicking on the tab.
Select the appropriate shift if the worker is working shifts. If the worker does not work shifts, leave the Shift Rate and Factor fields blank. The default value is .
Shift Rate
Enter the Shift Rate information.
Shift Factor
Enter the Shift Factor information.
Standard Hours
Instruction
Standard Hours
Enter the number of standard hours.
Work Period
Enter the Work Period or select a work period by clicking the search icon.
FTE
Enter the full-time equivalent (FTE) information.
Contract #
Description/Instruction
Contract Number
Enter the contract number or select a number by clicking the search icon.
Contract Type
Populated information that corresponds with contract number entered or selected.
- Click the icon to display the fields in the USA section. The Add a Person page - Job Information tab - USA section is displayed.

- Complete the fields as follows:
USA
Instruction
*FLSA Status
Required field. Select the Fair Labor Standards Act (FLSA) status from the drop-down list. Valid values are and . Defaults to .
*EEO Class
Required field. Select the Equal Employment Opportunity (EEO) class from the drop-down list.
Work Day Hours
Enter the work day hours.
At this point, the following options are available:
Step
Description
Click
Saves the record.
Click
Cancels the record.
Click
Saves the record and sends it to NFC for processing.
Click
Views the data on the previous tab.
Click
Views the data on the next tab.
Click
Refreshes the page.
See Also |