Process Monitor
The Process Monitor is used to access the Process List page. This option allows authorized users to view the status of a submitted process request.
This option allows users to specify the location where a process or job will run and the format used for the output.
To Complete the Run Function:
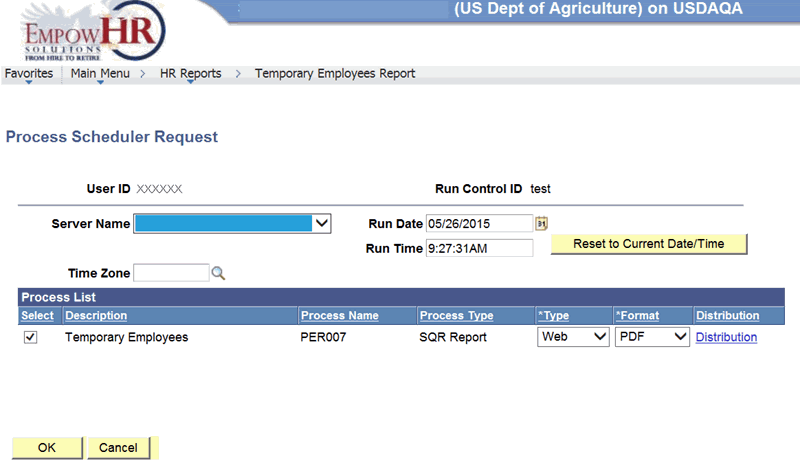
- On any EmpowHR report, select the button. The applicable Process Scheduler Request page is displayed.

- Complete the fields as follows:
Field
Description/Instruction
User ID
Populated with the applicable user ID.
Run Control ID
Populated with the name of the report being run.
Server Name
Select the applicable server name from the drop-down list.
Run Date
Defaults to the current date. To change the date, select a date from the calendar icon.
Run Time
Defaults to the time the report is run. Select to retrieve the current date and time for the report.
Time Zone
Time zone for the running of the report. Select data by selecting the search icon.
Process List
Instruction
Select
Check this box to select the report. Uncheck if applicable.
Description
Select this column to sort by description.
Process Name
Select this column to sort by process name.
Process Type
Select this column to sort by process type.
*Type
Required field. Select this column to sort by type.
*Format
Required field. Select this column to sort by format.
Distribution
Select this column to sort by distribution type.
- Select the button to return to save the information entered.
At this point, the following options are available:
Step
Description
Select
Returns to the selected report option page.
Select
Displays the Distribution Detail page.
To Use the Distribution Detail Page:
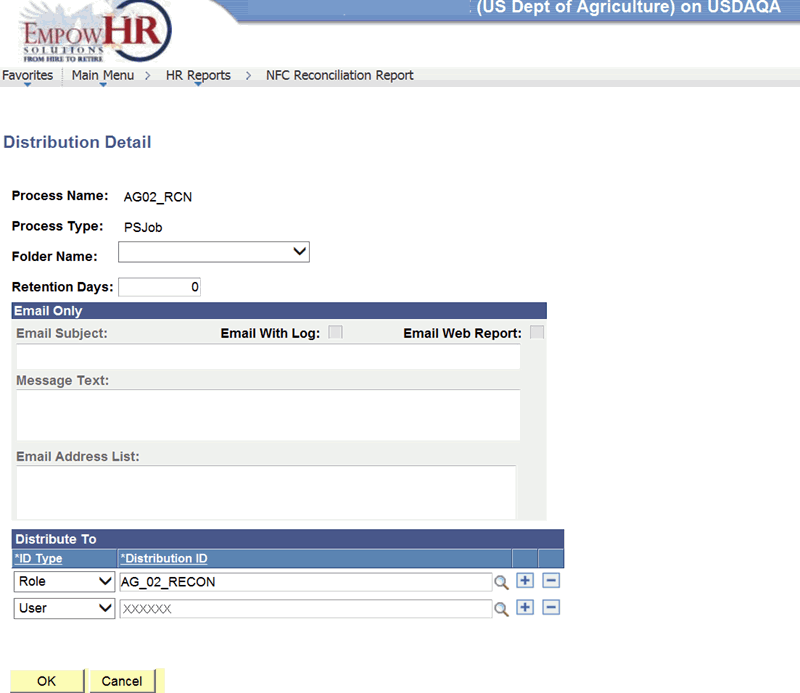
This Distribution Detail page allows the user to distribute the report to one or more persons that have access to reports.
- On the applicable Process Scheduler Request page, select the button. The applicable Distribution Detail page is displayed.

- Complete the fields on the Distribution Detail page as follows:
Field
Description/Instruction
Process Name
Populated from the Process Scheduler page.
Process Type
Populated from the Process Scheduler page.
Folder Name
Select the applicable folder name from the drop-down list.
Retention Days
Type the number of days to retain the report data.
Email Only
Instruction
Email Subject
Type the subject of the email.
Email With Log
Check this box to include the log information in the email.
Email Web Report
Check this box to send the report via the Web.
Message Text
Enter the message for the recipient of the email.
Email Address List
Enter the email address(es) of the receiver(s).
Distribute To
Instruction
*ID Type
Required field. Defaults to . To change the information, select data from the drop-down list. Valid values are and .
*Distribution ID
Required field. Defaults to the person’s logon ID running the report. This user’s ID can be changed by selecting the search icon. To add an additional Distribution ID, select the . Select the to remove a user.
- Select the button to save the information and to return to the Process Scheduler page.
OR
Select the button to cancel the information and return to the Process Scheduler page.
See Also |