Creating a New Query
Below is a list to help in understanding the difference between public and private queries.
- Anyone can use a public query.
- Only the person who created a private query can use it.
- It is important not to make changes to any query that the user did not create. To make changes to a query, rename and save the query before making changes.
- Always save the private version that is created from a public query with a unique name. It is recommended to use initials as the first three letters of the query name.
- If a public query is created, consider creating a private copy with a unique name for specific use by the user. Therefore, if someone mistakenly changes a public query that the user created, a copy of the original will be available.
- When searching for a query from , EmpowHR will automatically list all private queries. Only the person that created the query will see these items. The public queries will be listed after the private queries.
- If a public query is run and does not receive the results, the user may not have the authorization to access some of the data used in that query.
Below are some tips for saving queries.
- Queries can be saved from any tab except the and tabs.
- The query name must be in all capital letters.
- Names can be up to 30 characters in length.
- No spaces or special characters are allowed except an underscore.
- It is suggested that initials are used before the query name.
- The Description can also be up to 30 characters in length.
- The Query Type will almost always be .
- Choose or ownership depending on whether other should access the query.
- The Query Definition field allows for more detailed description or special notes.
To Create a Query:
- Select the menu group.
- Select the menu.
- Select the component. The Query Manager page is displayed.
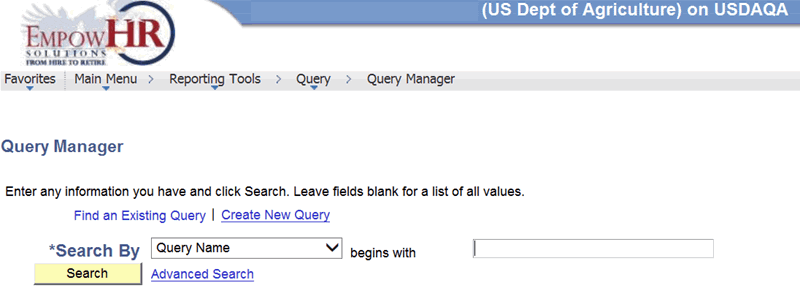
- Select the link. The Query Manager page - Records tab is displayed.
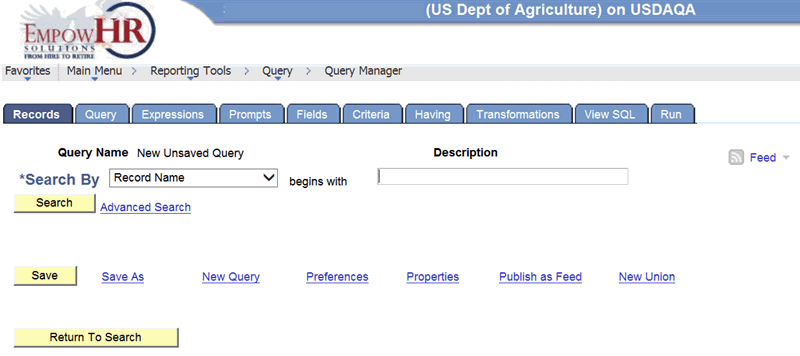
- Complete the fields as follows:
Field
Description/Instruction
*Search By
Required field. Select the value for the search criteria or select data from the drop-down list. Valid values are , , , and .
begins with
Corresponds to the Search By value.
- Select the button. The Search Results page is displayed based on the search criteria entered.
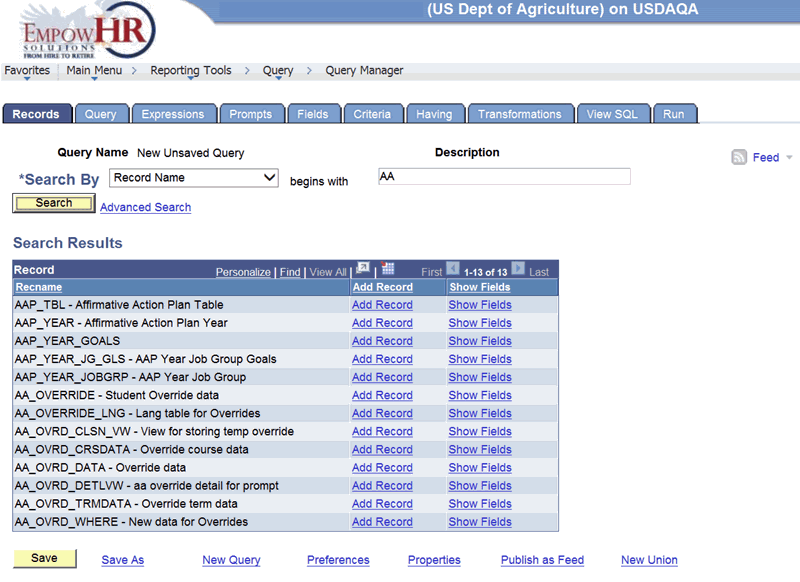
- Select the link to add the record to the query. The Query tab is displayed with the fields available for the applicable record.
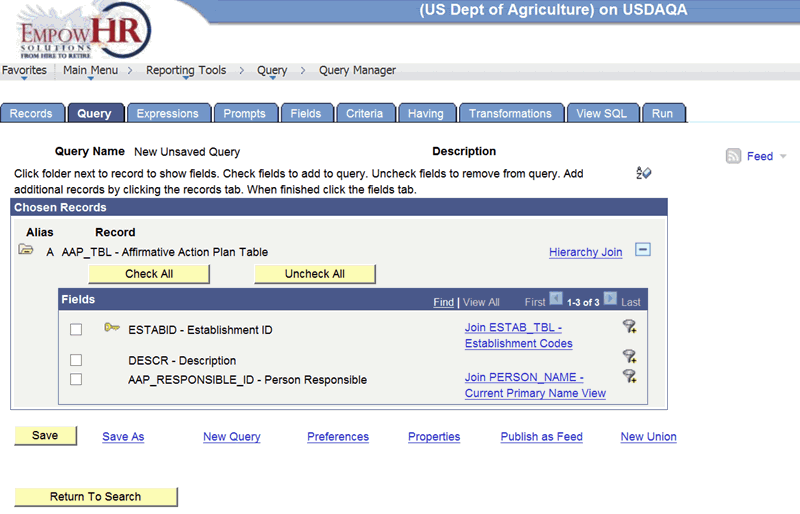
- Check the boxes next to the fields that should be displayed on the query output. The fields selected will populate to the Fields tab.
OR
Select the button to select all of the fields.
OR
Select the button to deselect all of the fields.
- Select the button. The Enter a Name To Save this Query page is displayed.
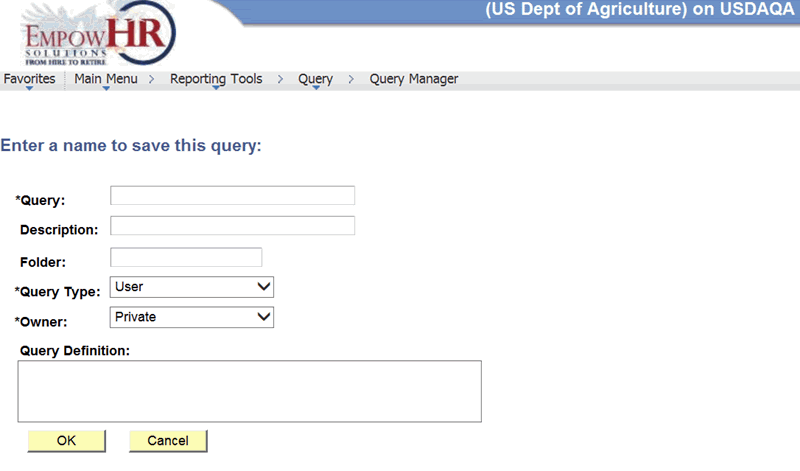
- Complete the fields as follows:
Field
Instruction
*Query
Required field. Enter the query name.
Description
Enter description of the query.
Folder
Enter the folder where the query will be saved.
*Query Type
Required field. Defaults to and can be changed by selecting data from the drop-down list. Valid values are , , , and .
*Owner
Required field. Defaults to . Valid values are and .
Query Definition
Enter the definition of the query.
- Select the button to save the new query.
OR
Select the button to return to the Fields tab.
To Join Records:
- Select the tab. The Query Manager page - Records tab is displayed. This page displays different information depending when the tab is selected. If the tab is selected after the initial search, then the page is displayed with no information. If the tab is selected after the Query tab is selected, then the page is displayed with the information populated from the Query tab.
- Select the link. The Select Join Type page is displayed.
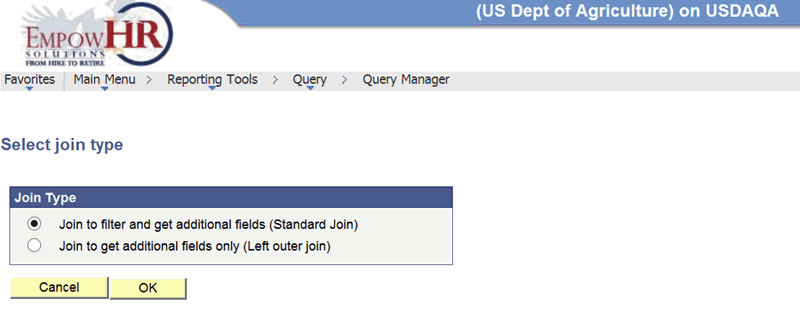
- Select the applicable radio button depending upon the type of join.
- Select the button. This will join the record in the query.
To Work with Fields:
At this point the records and fields have been selected and saved.
- Select the tab. The Query Manager page - Fields tab is displayed.
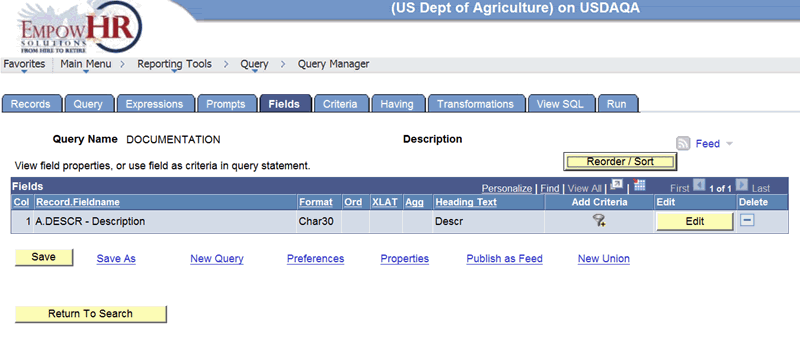
EmpowHR identifies each field with a letter preceding the field name. The letter corresponds to the record from which the field is chosen. The records are labeled in sequential order, according to when the record is chosen.
- Select the button in the upper-right corner of the Query Manager page - Fields tab to resort the fields in a different order in the query output. The Edit Field Ordering page is displayed.
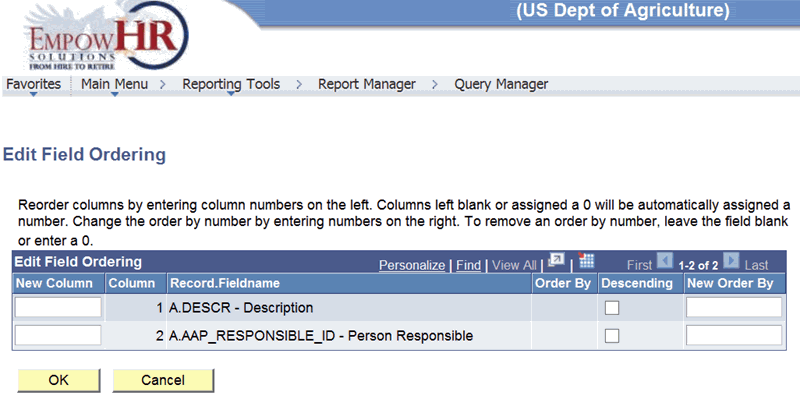
- Reorder columns by entering column numbers on the left under New Column. Columns left blank or assigned a and will be automatically assigned a number. Change the order by entering numbers on the right under New Order By. To remove an order that has a number, leave the field blank or enter a .
- Select the button to display the new order of the fields.
To Add Criteria:
This option allows the user to narrow down the amount of records in the query output and to choose specific types of data needed to add criteria to the query.
- Select the tab. The Query Manager page - Criteria tab is displayed. The Criteria tab has several criteria elements. EmpowHR added these elements automatically to the query when the records were joined.
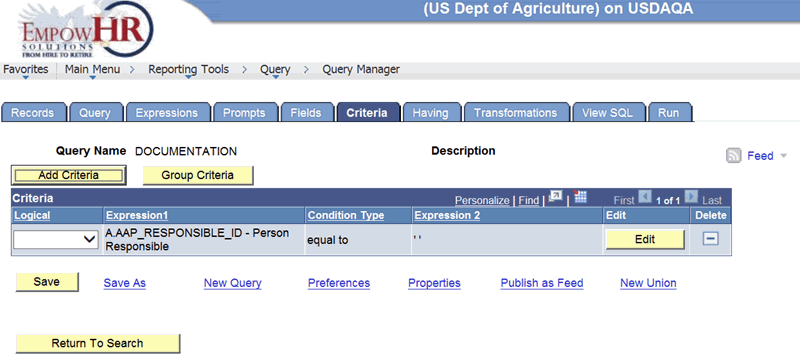
- Select the button to add the criteria for the report. The Edit Criteria Properties page is displayed.
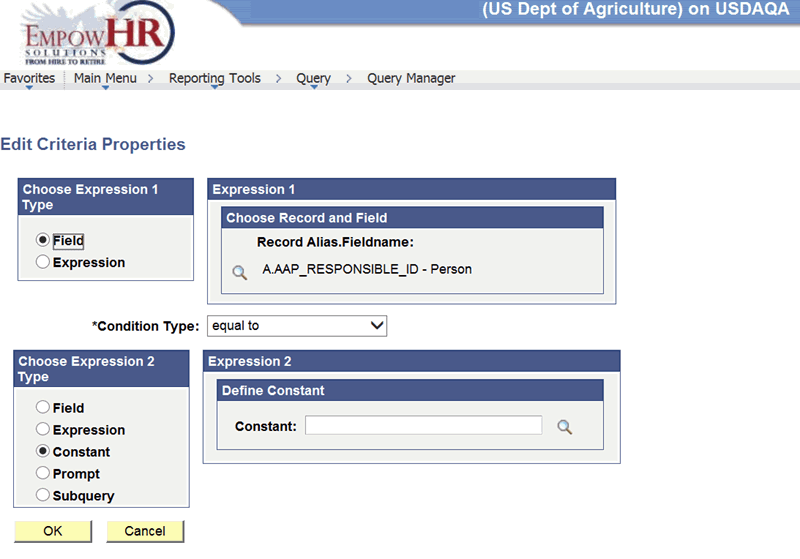
- Complete the fields as follows:
Field
Instruction
Choose Expression 1 Type
Select the applicable radio button. Valid values are and .
Expression 1 Choose Record and Field
Description
Record Alias.Fieldname
Displays the field name selected from the Fields page.
Field
Description/Instruction
*Condition Type
Required field. Defaults to . Change if applicable by selecting data from the drop-down list. The following table describes the available Condition Types. For each Condition type, Query manager offers a not option that reverses its effect. For example, returns all rows that would not return.
Choose Expression 2 Type
Displays the value that corresponds to the Expression 1 Type.
Expression 2 Define Constant
Instruction
Constant
Enter the constant or search for and select a constant by selecting the search icon.
Based on the options selected in each field, a new page may be displayed. Enter applicable information on each page.
- Select the button to save the entries. The Query Manager page - Criteria tab is displayed.
OR
Select the button to cancel the entries. The Query Manager page - Criteria tab is displayed.
Other Ways to Add/Edit Criteria on the Query Tab:
- Select the tab. The Query Manager page - Query tab is displayed.
- Select the + next to the field to add criteria to that field. The Edit Criteria Properties page is displayed.
- Add/edit the applicable criteria.
- Select the button.
Other Ways to Add Criteria on the Criteria Tab:
- Select the tab. The Query Manager page - Criteria tab is displayed.
- Select the button. The Edit Criteria Properties page is displayed.
- Select the search icon in the Expression 1 group box. The Select a field page is displayed.
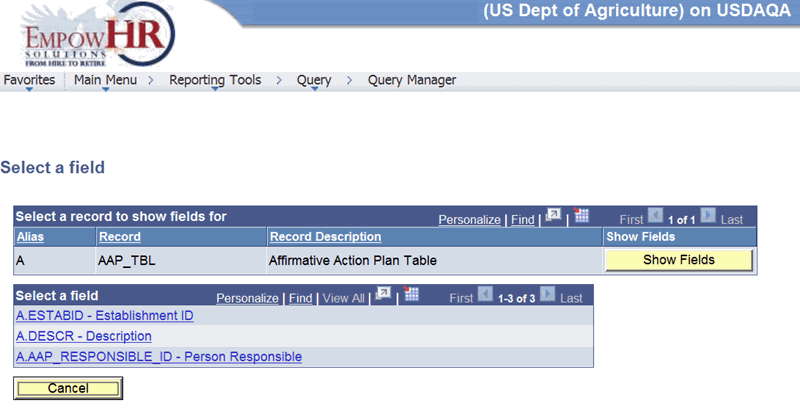
- Select the button to view the record.
- Select any link under Select a Field to select the applicable record. The Edit Criteria Properties page is displayed.
To Remove Criteria:
- Select the tab. The Query Manager page - Criteria tab is displayed.
- Select the - beside the applicable criteria statement to delete. The criteria is deleted.
To Work with Prompts:
Queries can be designed to prompt for information when they are run. Therefore, the results of the query are narrowed to only the data matching the information entered, rather than data from all records.
- Select the tab. The Query Manager page - Criteria tab is displayed.
- Select the button. The Edit Criteria Properties page is displayed.
- Select the search icon in the Expression 1 group box. The Select a field page is displayed.

- Select the button. A list of available fields is displayed.
- Select a field name. You are returned to the Edit Criteria Properties page.

- Select the link. The Edit Prompt Properties page is displayed.
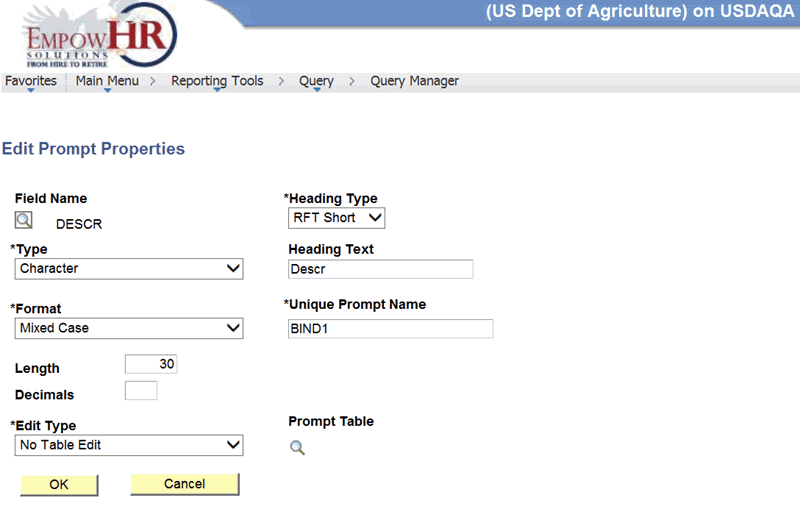
- Review the information on the Edit Prompt Properties page and make any changes if applicable.
- Select the button to save any changes made. You are returned to the Edit Criteria Properties page.
OR
Select the button to close the page and return to the Edit Criteria Properties page.
- On the Edit Criteria Properties page, select the drop-down list next to the Condition Type.
- Select .
- In the Choose Expression 2 Type group box, select the radio button. The Define Prompt field is displayed.
- Change the Heading Type as applicable.
- Change the Heading Text as applicable. The Heading Text is the message that will be displayed when prompted.
- To search the prompt selections, verify that the value is selected on the *Edit Type drop down.
- Select the button. The Edit Criteria Properties page is displayed.
- Select the button. The Query Manager page - Criteria tab is displayed.
To Work with Translate Values:
When selecting fields, sometimes it is necessary to join to another record to retrieve the description for that field. For some fields, EmpowHR includes an value that allows the viewing of the descriptive version of the field without going to a separate table.
- Select the tab. The Query Manager page - Fields tab is displayed. On the column headings above the fields, if the field is a translate value, an will appear under the column heading.
- Select beside a field name. The Edit Field Properties page is displayed.
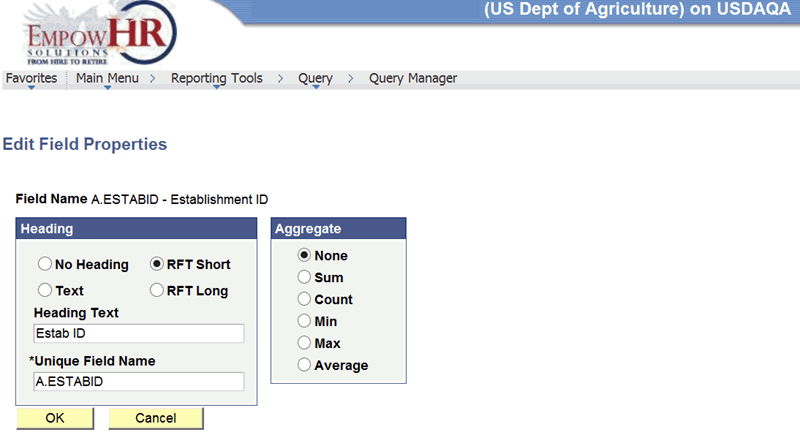
- The Heading field gives the option to either select or for either a short or long description. Make the applicable selection.
- Select the button. The Fields tab is displayed. An now appears in the column heading.
To Export Data:
Query Manager allows the export of data to Excel or to a text document in CSV format. Export data is derived from the tab.
- Select the component.
- Search for a query that has been created. The Query Manager page is displayed with a list of available queries. Each query has the option of either being run in an Excel or HTML format.
- Select the or link without opening the query.
- Select the button to open the type of selection made and view the query.
OR
Select the button to save a file.
OR
Select the button to return to the page.
See Also |