|
|
|
|
|
Adding an Employee
Employees should be loaded to webTA through the bi-directional feed between the Agency and NFC. However, these directions are provided in the event that an employee would need to be added directly to webTA.
To Add an Employee:
- Select the button from the Timekeeper Main Menu page. The Employee Profile page is displayed with default fields populated.
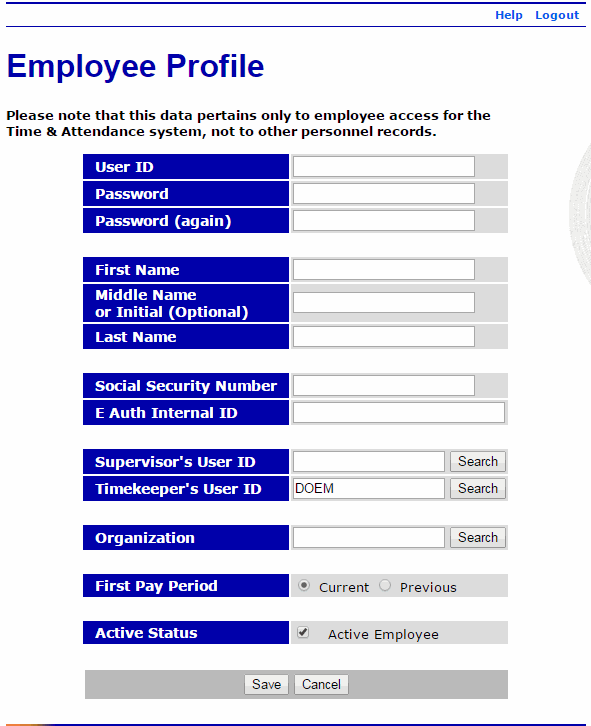
- Complete the fields as follows:
Field
Description/Instruction
User ID
Enter a unique user ID.
Password
Enter a password based on the requirements defined by the Agency.
Password (again)
Enter the password again.
First Name
Enter the employee's first name.
Middle Name or Initial (Optional)
Optional.
Enter the employee's middle name or initial.
Last Name
Enter the employee's last name.
Social Security Number
Enter the employee's Social Security number.
E Auth Internal ID
N/A
Supervisor's User ID
Enter the user ID of the employee's Supervisor.
OR
Select the button to search for the Supervisor by name.
Timekeeper's User ID
Displays the user ID of the Timekeeper adding the employee. To change the employee's timekeeper, type the timekeeper's user ID.
OR
Select the button to search for the Timekeeper by name.
Organization
Enter the employee's organizational structure.
OR
Select the button to select the organizational structure from a list.
First Pay Period
Select the button if the newly added employee begins working within the current pay period.
OR
Select the button if the newly added employee began working before the current pay period.
Active Status
Uncheck this box if employee is inactive.
- Select the button. The Timekeeper Main Menu page is displayed.
- Select the button. The Timekeeper Select Employee page is displayed with the employee showing with a status of .
- Select the button from the Selected T&A list. The T&A Profile page is displayed.

- Complete or edit the applicable fields as follows:
Field
Description/Instruction
Status Change
Indicates a status change for the employee.
Status Change Type
Select the type from the drop-down list. Valid values are , , or . and apply when employment status actually starts and ends in a given pay period.
Status Change Day
If status change type is set to or , a day must be selected to display the day of the change.
Work Schedule
Must be completed (all fields) before the T&A Profile can be saved.
Pay Plan
Displays the employee's pay plan.
Tour of Duty
Displays the employee's tour of duty.
Duty Hours
Displays the employee's scheduled biweekly hours. For full-time employees, this number should be .
Work Week
Displays the employee's regular schedule.
Alternative Schedule
Displays the employee's alternative or compressed work schedule, if applicable.
Contact Point
Generates from the profile of the employee's Timekeeper.
Agency
Displays the employee's Agency.
State
Displays the employee's 2-position alpha State code.
Town
Displays the 4-digit town code for the employee's duty station.
Unit
Displays the employee's 2-digit unit code.
Timekeeper
Displays the 2-digit unit code of the employee's Timekeeper.
New Contact Point
Select this box if the employee's contact point information changed during the pay period.
Overtime/Standby Status
Description/Instruction
RSO/Salary Cap
Displays the employee's regularly scheduled overtime (RSO) hours in the first, second, or both weeks of the pay period.
Standby Hrs/Week 1
Displays the number of standby or AUO hours the employee is entitled to work in the first week of the pay period.
Standby Hrs/Week 2
Displays the number of standby or AUO hours the employee is entitled to work in the second week of the pay period.
Standby/AUO %
Displays the number of hours of standby used in the pay period or the percentage of AUO. Enter to end standby hours.
Miscellaneous
Instruction
Oath of Office
Select this box if this is the first T&A for this employee within your Agency (i.e., an accession action).
Final Report
Select this box if this is the last T&A for this employee (i.e., a separation action).
On Hold
Select this box when a T&A report is not required for an employee.
Retain Data
Allows the Timekeeper to control how much and what type of data is maintained from one pay period to the next. Valid values are:
Value
Meaning
Deletes all payroll information at the beginning of the pay period.
Retains all payroll information.
Retains the transaction code and accounting information, deleting only the hours.
Restores data to the default schedule each pay period.
Restores data to the default schedule each pay period; only exceptions to the employee's default schedule need to be entered.
N/A
Accounting
Instruction
Manual Account Entry
Select this option to allow the employee or Timekeeper to choose the accounting code individually for each transaction included on the T&A.
Stored Account (NFC)
Select this option to allow all transactions on the T&A to use accounting stored by NFC. The accounting is not set in the build file, and the accounting section on the T&A displays instead of showing the actual accounting.
Local Account (Local)
Select this option to allow the employee to use the same accounting code within the application (not stored at NFC).
Account
Select the accounting code from the drop-down list to use on the T&A when Stored Account (NFC) or Local Account (Local) has been selected.
Leave Parameters
Description/Instruction
Service Computation Date
Defaults to the day of entry. Use the calendar to change the date, if needed. This field is used to determine the employee's annual leave earning category. When this field is completed by the Timekeeper (or Master Timekeeper), webTA automatically adjusts the annual leave category when 3 and 15 years of service have been reached.
Override Lv Category
Is used to set the Annual Leave Category for an employee.
Override Leave Ceiling
Is used to set an alternative leave ceiling for an employee. Selecting this option overrides the automatic reset of the leave ceiling at the end of the calendar year.
Approved Leave Recipient (VLTP)
Indicates if (in the pay period) the employee is eligible for donated leave as an approved Voluntary Leave Recipient.
Approved Leave Recipient (ELTP)
Indicates if (in the pay period) the employee is eligible for donated leave as an approved Emergency Leave Recipient.
Home Leave Accrual Rate
Is used to set an alternative home leave accrual rate for an employee. Selecting this option overrides the automatic reset of the accrual rate at the end of the calendar year, preserving the override value.
Home Leave Start Date
First date the employee is eligible for home leave.
Home Leave End Date
Last date the employee is eligible for home leave.