Identification Data
This component identifies citizenship, passport, visa and permit information, and an employee photo.
To Add Identification Information for an Employee:
- On the EmpowHR Main Menu page, select the menu group.
- Select the menu.
- Select the menu item.
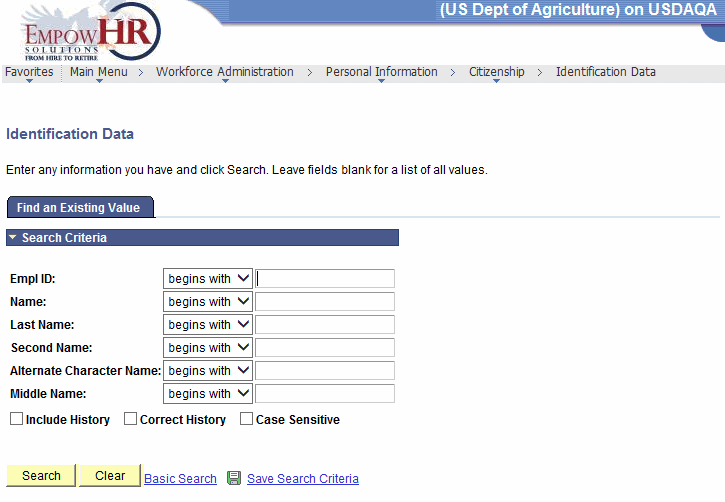
- Select the component. The Identification Data page - Find an Existing Value tab is displayed.

- Complete the fields as follows:
Field
Description/Instruction
Empl ID
Enter the beginning specific character or characters of the employee ID.
OR
Click the down arrow for additional options to narrow results.
OR
Enter the employee lD.
Name
Enter the beginning specific character or characters of the employee's first name.
OR
Click the down arrow for additional options to narrow results.
OR
Enter the employee's first name.
Last Name
Enter the beginning specific character or characters of the employee's last name.
OR
Click the down arrow for additional options to narrow results.
OR
Enter the employee's last name.
Second Name
Enter the beginning specific character or characters of the employee's second name.
OR
Click the down arrow for additional options to narrow results.
OR
Enter the employee's second name.
Alternate Character Name
Enter the beginning specific character or characters of the employee's nickname.
OR
Click the down arrow for additional options to narrow results.
OR
Enter the employee's nickname.
Middle Name
Enter the beginning specific character or characters of the employee's middle name.
OR
Click the down arrow for additional options to narrow results.
OR
Enter the employee's middle name.
Include History
Check this box if applicable.
Correct History
Check this box if applicable.
Case Sensitive
Check this box if applicable.
- Click to search for the values entered.
OR
Click to clear all entries.
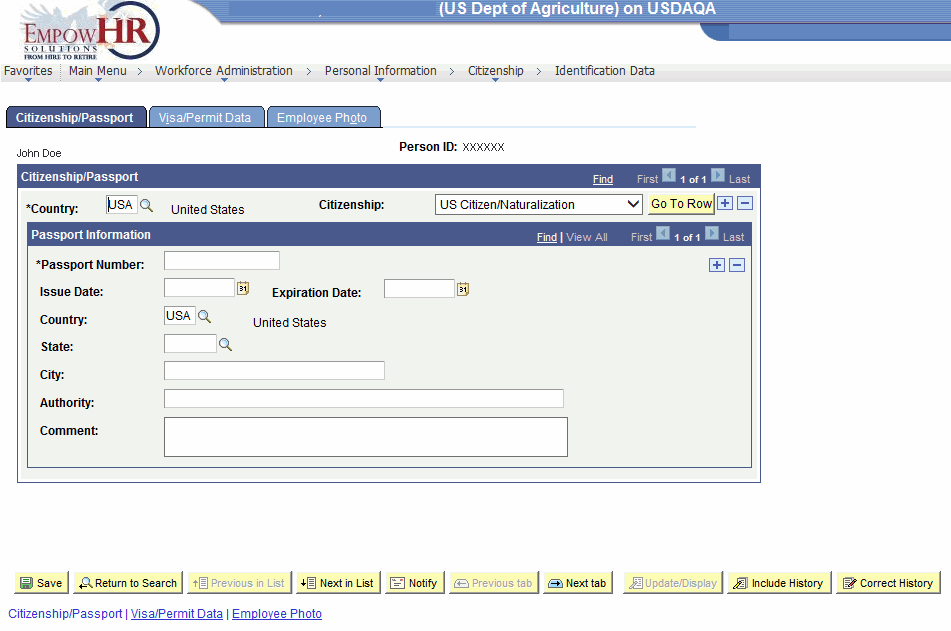
- Select the applicable value from the search results. The Identification Data page - Citizenship/Passport tab is displayed.

- Complete the fields as follows:
Field
Description/Instruction
Person ID
Populated with the system-generated ID.
Citizenship/Passport
Instruction
*Country
Required field. Enter the country or select a country by clicking the search icon.
Citizenship
Select the citizenship status from the drop-down list.
Passport Information
Instruction
*Passport Number
Required field. Enter the passport number.
Issue Date
Enter the date the passport was issued or select a date by clicking the calendar icon.
Expiration Date
Enter the date the passport will expire or select a date by clicking the calendar icon.
Country
Defaults to . Enter the country or select a country by clicking the search icon.
State
Type the State abbreviation or select a State by clicking the search icon.
City
Type the city.
Authority
Type the authority information.
Comment
Type any applicable comments.
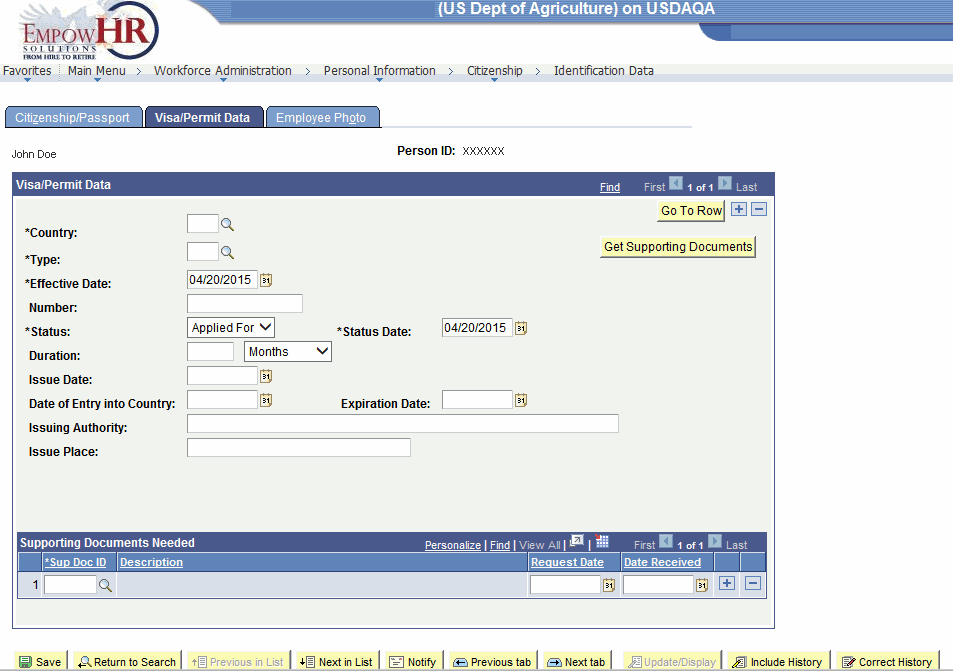
- Select the tab. The Identification Data page - Visa/Permit Data tab is displayed.

- Complete the fields as follows:
Field
Description/Instruction
Person ID
Populated with the system-generated ID.
Visa/Permit Data
Instruction
*Country
Required field. Enter the country or select a country by clicking the search icon.
*Type
Required field. Select the type of visa/permit or select a type by clicking the search icon.
*Effective Date
Required field. Enter the effective date or select a date by clicking the calendar icon.
Number
Enter the visa/permit number.
*Status
Required field. Select a status from the drop-down list.
*Status Date
Required field. Enter the status date or select a date by clicking the calendar icon.
Duration
Enter the number of the duration of the visa/permit, then select the timeframe from the drop-down list.
Issue Date
Enter the date the visa/permit was issued or select a date by clicking the calendar icon.
Date of Entry into Country
Enter the date the employee entered into the country or select a date by clicking the calendar icon.
Expiration Date
Enter the expiration date of the visa/permit or select a date by clicking the calendar icon.
Issuing Authority
Enter the issuing authority.
Issue Place
Enter the place the visa/permit was issued.
Supporting Documents Needed
Description/Instruction
*Sup Doc ID
Required field. Enter the supporting document ID or select an ID by clicking the search icon. The description of your entry or selection is displayed to the right.
Description
Populated based on the supporting document ID entered or selected.
Request Date
Enter the request date of the visa/permit or select a date by clicking the calendar icon.
Date Received
Enter the receipt date of the visa/permit or select a date by clicking the calendar icon.
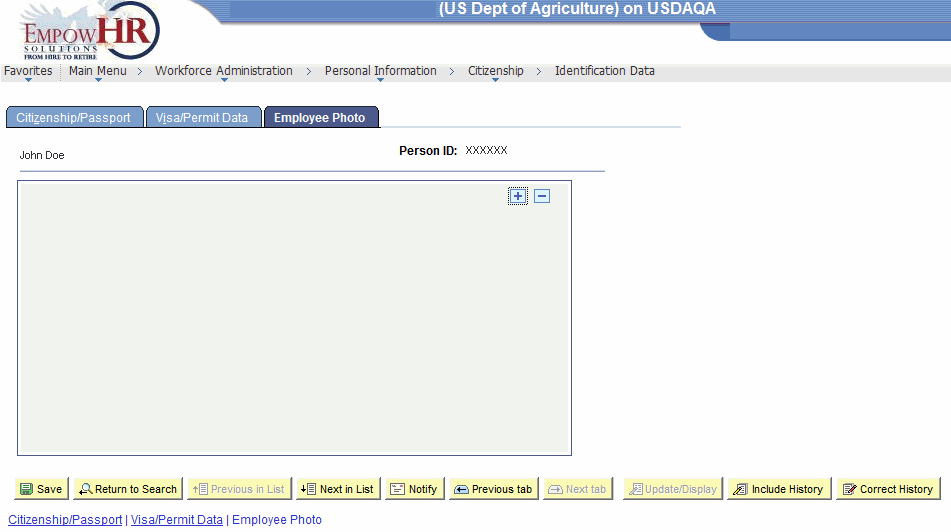
- Select the tab. The Identification Data page - Employee Photo tab is displayed.

- Complete the fields as follows:
Field
Description/Instruction
Person ID
Populated with the person ID assigned to the person.
Employee Photo
Click to add the employee’s photo or to remove the photo.
At this point, the following options are available:
Step
Description
Click
Saves the new data entered.
Click
Returns the user to the applicable page to search for another record.
Click
Returns to the previous person in the list.
Click
Advances to the next person in the list.
Click
Notifies the next individual in the workflow.
Click
Returns to the previous tab on the page.
Click
Views the data on the next tab.
Click
Returns the user to the applicable page to update the data entered.
Click
Includes historical data.
Click
Returns the user to the applicable page to correct history data.