Entering Health Benefits
- To enter health benefits data, select the Payroll Documents menu group.
- Select the Health Benefits component. The Find an Existing Value - Health Benefits page is displayed. The information on this page will allow you to locate an existing employee to enter or change health benefits information.
- Enter the search criteria.
- Select the Search button. The Health Benefits page - Elections tab is displayed.
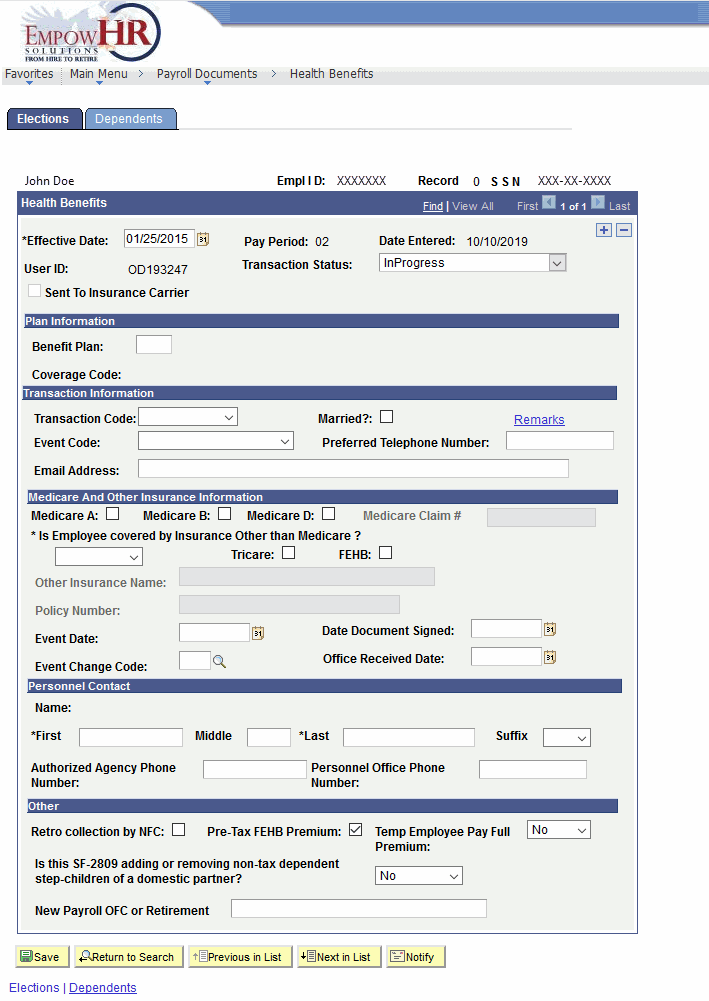
Figure 24: Health Benefits Page - Elections Tab
The following fields are displayed:
|
Field |
Description/Instruction |
|---|---|
|
Name |
Populated from the Empl ID. |
|
Empl ID |
Populated from the Empl ID used in the search criteria. |
|
Record |
Populated with the number of records for the employee. |
|
SSN |
Populated with the SSN of the employee. |
- Complete the Health Benefits fields as follows:
|
Field |
Description/Instruction |
|---|---|
|
Effective Date |
Required field. Enter a date or select a date from the calendar icon. This is the date on which a table record becomes effective (e.g., the date that an action begins). This date also determines when to view or change information. |
|
Pay Period |
Populated with the pay period that corresponds to the effective date. |
|
Date Entered |
Populated with the date entered. |
|
User ID |
Displays the system identifier and name of the individual who generates the transaction. |
|
Transaction Status |
Defaults to In Progress and reflects the status of the transaction. The transaction status will change when the transaction is saved, in suspense, or resent to PPS. |
|
Sent to Insurance Carrier |
Check this box if the document has been sent to the insurance carrier. |
- Complete the Plan Information field as follows:
|
Field |
Description/Instruction |
|---|---|
|
Benefit Plan |
Enter the applicable information. |
|
Coverage Code |
Populated from the benefit plan entered. |
- Complete the Transaction Information fields as follows:
|
Field |
Instruction |
|---|---|
|
Transaction Code |
Select the applicable information from the drop-down list. The valid values are as follows: Cancel Change N Enrollment Pre–Tax Ch Reinstate Term 365 Term Carr Transfer in Transfer OU Waived |
|
Married? |
Select the box if married. |
|
Event Code |
Select the applicable information from the drop-down list. The valid values are as follows: Correction New Enrollment Open Season Other Reinstatement |
|
Preferred Telephone Number |
Enter the preferred telephone number for the employee. |
|
Email Address |
Enter the applicable email address. |
- Complete the Medicare And Other Insurance Information fields as follows:
|
Field |
Instruction |
|---|---|
|
Medicare A |
Check the box if applicable. |
|
Medicare B |
Check the box if applicable. |
|
Medicare D |
Check the box if applicable. |
|
Medicare Claim # |
Enter the claim number if applicable. |
|
Is Employee covered by Insurance Other than Medicare? |
Required field. Select the down arrow to designate whether or not the employee is covered by another insurance company other than Medicare. |
|
TRICARE |
Check the box if applicable. |
|
FEHB |
Check the box if applicable. |
|
Other Insurance Name |
Enter the applicable information. |
|
Policy Number |
Enter the applicable information. |
|
Event Date: |
Enter the applicable information. |
|
Date Document Signed |
Enter the date or select a date from the calendar icon. |
|
Event Change Code |
Enter the applicable information or select data by selecting the search icon. |
|
Office Received Date |
Enter the applicable date. |
- Complete the Personnel Contact fields as follows:
|
Field |
Description/Instruction |
|---|---|
|
Name |
Populated with the name of the personnel contact. |
|
First |
Required field. Enter the first name of the personnel contact. |
|
Middle |
Enter the middle name of the personnel contact, if applicable. |
|
Last |
Required field. Enter the last name of the personnel contact. |
|
Suffix |
Select the suffix from the drop-down list, if applicable. |
|
Authorized Agency Phone Number |
Enter the applicable telephone number. |
|
Personnel Office Phone Number |
Enter the personnel office telephone number. |
- Complete the Other fields as follows:
|
Field |
Instruction |
|---|---|
|
Retro Collection By NFC |
Check the box if applicable. |
|
Pre-Tax FEHB Premium |
Defaults to Yes. Uncheck the box if the response should be No. |
|
Temp Employee Pay Full Premium |
Select the applicable information from the drop-down list. The valid values are Yes and No. |
|
Is this SF-2509 adding or removing non-tax dependent step-children of a domestic partner? |
Select the applicable information from the drop-down list. The values are Yes and No. |
|
New Payroll OFC or Retirement |
Enter any new payroll office or retirement information if applicable. |
- From the Health Benefits page, select the Dependents tab. The Health Benefits page - Dependents tab is displayed. Dependent information is required each time a transaction is processed.

Figure 25: Health Benefits Page - Dependents Tab
The following fields are displayed:
|
Field |
Description/Instruction |
|---|---|
|
Name |
Populated from the Empl ID. |
|
Empl ID |
Populated from the Empl ID used in the search criteria. |
|
Record |
Populated with the number of records for the employee. |
|
SSN |
Populated with the SSN of the employee. |
- Complete the fields as follows:
|
Field |
Description/Instruction |
|---|---|
|
Effective Date |
Enter a date or select a date from the calendar icon. This is the date on which a table record becomes effective (e.g., the date that an action begins). This data also determines when the user can view and/or change information. |
|
Date Entered |
Populated with the date entered. |
|
User ID |
Displays the system identifier and name of the individual who generates the transaction. |
|
Transaction Status |
Defaults to In Progress and reflects the status of the transaction. The transaction status will change when the transaction is saved, in suspense, or resent to PPS. |
|
Benefit Plan |
Populated from the Elections tab - Health Benefits page. |
|
Coverage Code |
Populated from the Elections tab - Health Benefits page. |
- Complete the Dependents fields as follows:
|
Field |
Instruction |
|---|---|
|
Name: First |
Required field. Enter the first name of the dependent. |
|
Name: Middle |
Enter the middle name of the dependent, if applicable. |
|
Name: Last |
Required field. Enter the last name of the dependent. |
|
National ID (SSNO) |
Enter the applicable Social Security number. |
|
Date of Birth |
Required field. Enter the applicable birth date of the dependent or select a date from the calendar icon. |
|
Relationship |
Select the applicable information from the drop-down list. The valid values are as follows: Adopted Ch Child < 26 Child > 26 Foster Ch Spouse Stepchild |
|
Sex |
Required field. Select the applicable sex from the drop-down list. The valid values are Male or Female. |
|
Address 1 |
Enter the street address. This field allows for free flow text that describes the street number, apartment number, and other address information. |
|
Address 2 |
Enter the applicable street address. This field allows for free flow text that describes the street number, apartment number, and other address information. |
|
Address 3 |
Enter the applicable street address. This field allows for free flow text that describes the street number, apartment number, and other address information. |
|
City |
Enter the name of the city, State, and ZIP code for the address. |
|
Foreign Address Indicator |
Check the box if the address is in a foreign country. |
- Complete the Coverage Information fields as follows:
|
Field |
Instruction |
|---|---|
|
Medicare A |
Check the box if applicable. |
|
Medicare B |
Check the box if applicable. |
|
Medicare D |
Check the box if applicable. |
|
Medicare Claim # |
Enter the claim number if applicable. |
|
TRICARE |
Check the box if applicable. |
|
Other Insurance |
Required field. Select the down arrow to indicate whether or not the applicable dependent has other insurance coverage. |
|
FEHB |
Check the box if applicable. |
|
Other Insurance Name |
Enter the applicable information. |
|
Policy Number |
Enter the applicable information. |
- Select the Save button.
- Select the OK button. At this point, the following options are available:
|
Step |
Description |
|---|---|
|
Select the Return to Search button |
Searches for another employee |
|
Select the Previous in List button |
Views and/or changes the previous record |
|
Select the Next in List button |
Views and/or changes the next record |
|
Select the Notify button |
Sends an email to the next individual in the workflow |