Address Processing
An employee’s address information is entered during the Hire process. However, there may be situations that require the employee’s address information to change. Address information is sent to NFC.
This address appears on the pages under the most current row.
- To access the Address Processing page, select the PAR Processing menu group.
- Select the Address Processing component. The Address Info page - Find an Existing Value is displayed. The information on this page allows the user to locate existing data to enter or change the applicable information.
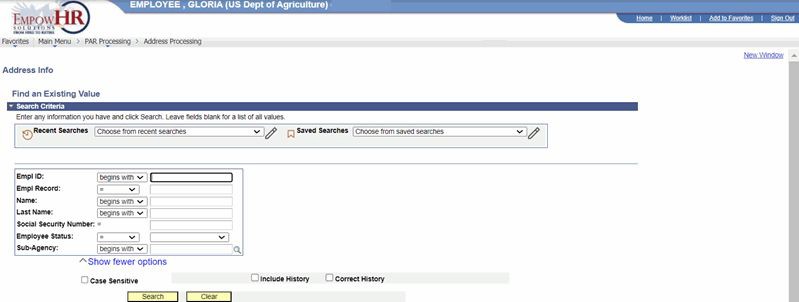
Figure 27: Address Info Page - Find an Existing Value
- Enter the applicable search criteria.
- Select Search. The Address Data tab is displayed.
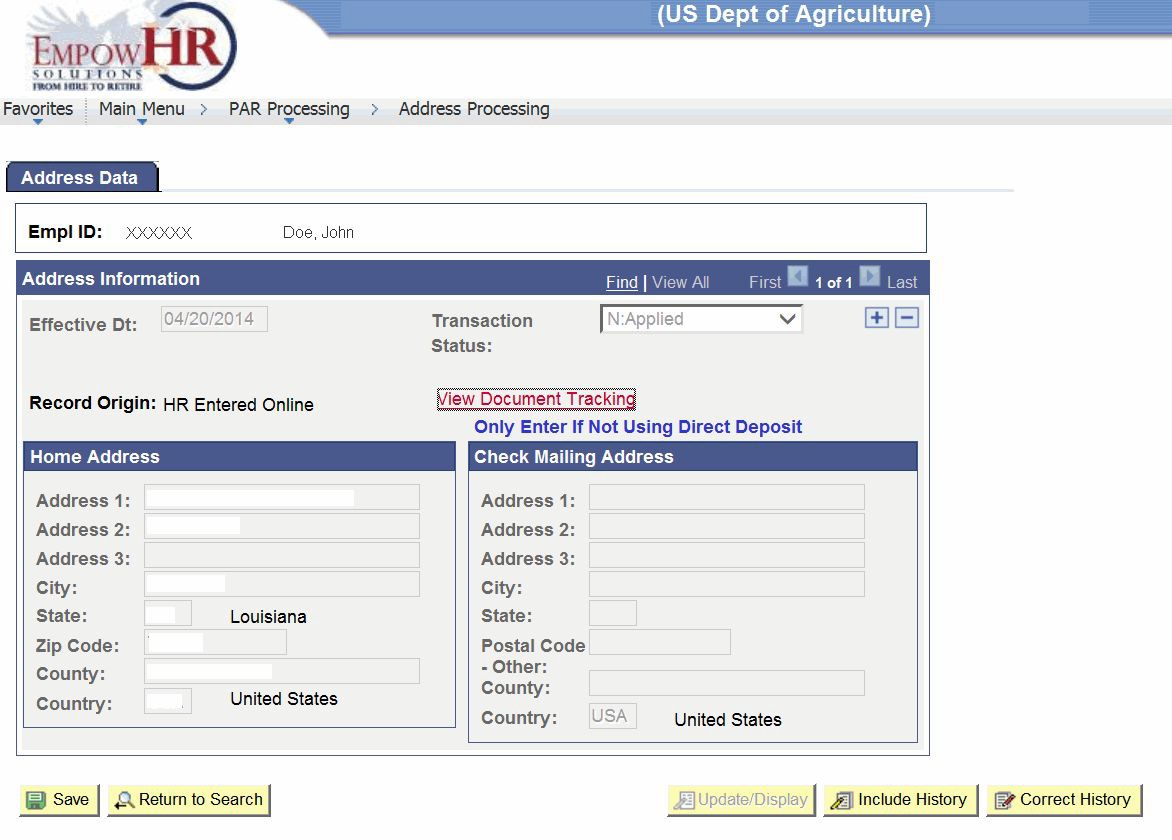
Figure 28: Address Data Tab
- Select + to add a new record. This allows the editing of the address.
- Complete or edit the fields as follows:
|
Field |
Description/Instruction |
|---|---|
|
Empl ID |
Populated from the search criteria entered. |
|
Address Information |
Description |
|
Effective Dt |
Defaults to the current date. This is the date the address is valid. The date must be a current or future pay period. Addresses may not be retroactively updated. |
|
Transaction Status |
Displays the transaction status. |
|
Record Origin |
Displays the source of the address. |
|
Home Address |
Description/Instruction |
|
Address 1 |
Enter the first line of the street address. |
|
Address 2 |
Enter the second line of the street address, if applicable. |
|
Address 3 |
Enter the third line of the street address, if applicable. |
|
City |
Enter the city or select data by selecting the search icon. |
|
State |
Enter the two-position alpha State code or select data by selecting the search icon. |
|
Zip Code |
Enter the five-digit required ZIP Code. ZIP Codes can be found on TMGT, Table 015. You can also enter the optional ZIP+4 Code in this field. |
|
County |
Reserved for future use. |
|
Country |
Defaults to USA. You can change the country by selecting the search icon and selecting a different country. |
|
Check Mailing Address (Only enter if not using direct deposit) |
Description/Instruction |
|
Address 1 |
Enter the applicable information. |
|
Address 2 |
Enter the applicable information. |
|
Address 3 |
Enter the applicable information. |
|
City |
Enter the city or select data by selecting the search icon. |
|
State |
Enter the State. |
|
Postal Code - Other |
Enter the five-digit required ZIP Code. ZIP Codes can be found on TMGT, Table 015. You can also enter the optional ZIP+4 Code in this field. |
|
County |
Reserved for future use. |
|
Country |
Defaults to the country of the city. |
- Select the - to delete a record if it was added in error.
- Select Save button to save the information. The message Please notify the employee of their responsibility to contact the FEHB/BENEFEDS carriers of their new address. If employee has BENEFEDS (FEDVIP, FSAFEDS, FLTCIP), contact BENEFEDS directly, is displayed.
At this point, the following steps are available:
|
Step |
Description |
|
Select Return to Search |
Returns the user to the applicable page to search for another record. |
|
Select Update/ Display |
Returns the user to the applicable page to update the data entered. |
|
Select Include History |
Includes historical data. |
|
Select Correct History |
Returns the user to the applicable page to correct history data. |